
Inside this Article
Step 1: Define Your Audience, Niche, and Blog Business PlanStep 2: Select a Suitable Domain NameStep 3: Sign Up With a Reliable Web Hosting ServiceStep 4: Install WordPress and Set Up Your Book Blog SiteStep 5: Set Up and Customize the Most Relevant PagesStep 6: Revise, Test, and Publish Your Book Blog SiteHow To Promote Your Book Blog WebsiteAn Easier Alternative To Get a Book Blog OnlineYour Literary Journey Begins Now!FAQ
Step 1: Define Your Audience, Niche, and Blog Business Plan
When starting a book blog, identifying your niche is crucial to ensure you attract and engage your target audience. Your niche should reflect your interests and the specific topics within the literary world that you are passionate about.

- Explore your interests. Consider genres, themes, or types of books that resonate with you. Are you drawn to fantasy novels, historical fiction, or perhaps non-fiction? Your genuine enthusiasm will keep you motivated to create new content and produce engaging material.
- Conduct audience research. Look for online communities, such as Goodreads groups or book-focused social media platforms, to observe discussions and preferences. Pay attention to the types of content that generate engagement and what readers are seeking in a blog.
- Analyze competitors. Review other book blogs within your potential niche. What topics do they cover? How do they engage their readers? Identify gaps or unique angles you can explore to differentiate your blog.
- Put together a plan and budget. You should compile your research findings and formulate a business plan using them. You’ll also want to attach a budget outlining how much your book blog project will cost, taking into account necessary expenses, your expected income, and potential revenue channels.
Step 2: Select a Suitable Domain Name
Every blog has a domain name, and your new book blog will be no exception. The domain name is what your readers will be typing into their address bar to access your blog. For example, “google.com” is the domain name for Google.
Choosing a good domain name for your book blog is a crucial step. It’s not just about being catchy – you should select a name that resonates with your audience and reflects your blog’s focus. Begin by brainstorming a list of words that reflect the type of books you plan to review or discuss. Alternatively, if your blog is more generalized, you could try to brainstorm words that will reflect your approach to book reviews.
Try to keep it short and easy to remember and avoid numbers or hyphens, as they can complicate things for your audience. A unique yet straightforward domain name ensures your blog stands out while being simple enough for readers to recall and type. I’d also recommend coming up with a short list of ideas, as it’s possible a desired domain name may be already taken when it becomes time to register it.
Finally, don’t forget to consider the long-term potential of your domain. As your blog grows, your content might expand beyond your original niche. Selecting a name and domain that gives you room to evolve will help you stay flexible while appealing to new readers. Keep in mind that while a domain and web hosting are typically two separate services and costs, some hosts – like Hostinger – offer a free domain with their hosting plans.
Step 3: Sign Up With a Reliable Web Hosting Service
Web hosting services make it possible for your book blog to be available online. Without them, your blog’s posts, images, and pages would have nowhere to live on the internet. When you sign up for hosting, you’re essentially renting space on a server where all your blog’s files will be stored, making it possible for visitors to access your site at any time.
I recommend using the WordPress Content Management System (CMS) to build your site, as it’s free to use and features tons of beginner-friendly tools. However, there are other free and paid CMS you can use to build your website.
When choosing a web host for your book blog, it’s important to prioritize certain features:- WordPress compatibility. If you’re using WordPress, ensure your host offers features like 1-click WordPress installation, WordPress-optimized performance, and support for its plugins, tools, and site management.
- Reliable performance. Select a hosting service with fast speeds and an uptime guarantee to keep your blog always accessible to readers.
- Extra features. Automatic backups, free SSL certificates, and robust security tools – like firewalls, malware scanners, monitoring, and recovery options – can safeguard your blog and simplify management.
Step 4: Install WordPress and Set Up Your Book Blog Site
Next up, it’s time to get started creating your website. I’m going to show you how to do it using WordPress. I’m on a Hostinger hosting plan, which makes setup very beginner-friendly, thanks to its intuitive hPanel control panel.
Most hosts, however, include a control panel with 1-click WordPress installation tools with their hosting plans. You can always ask customer support if you cannot find these tools in your control panel.
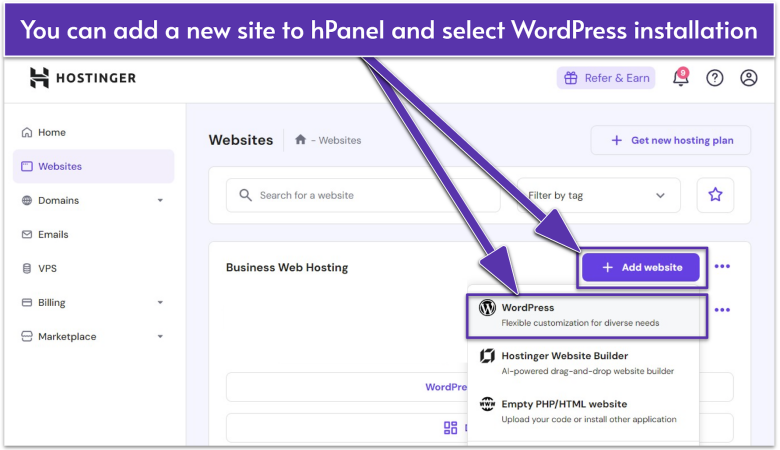
To begin the WordPress installation process with Hostinger:- Once you’ve signed up for your hosting plan, log into your hosting control panel and navigate to the Websites panel.
- Click the purple + Add website button and select WordPress.
- Next, navigate through the WordPress setup process, which includes creating a username and password to log into your WordPress Admin Dash.
- Wait for the WordPress installation process to complete.
![Hostinger hPanel Websites menu]()
Hostinger’s hPanel interface is clean, and features simplified installation tools - Before creating a website, you should check if your CDN and cache optimizations are enabled. These tools will speed up your site loading speeds locally and overseas. If your host doesn’t include them with its plans, you can sign up and activate these services yourself. With Hostinger, LiteSpeed, your CDN, and the object cache are all activated by default.
- Once WordPress is installed, you need to log into the WordPress Admin dashboard, which is separate from your hosting control panel. With Hostinger, you can log into the WordPress Admin dashboard password-free by clicking the WordPress Admin button.
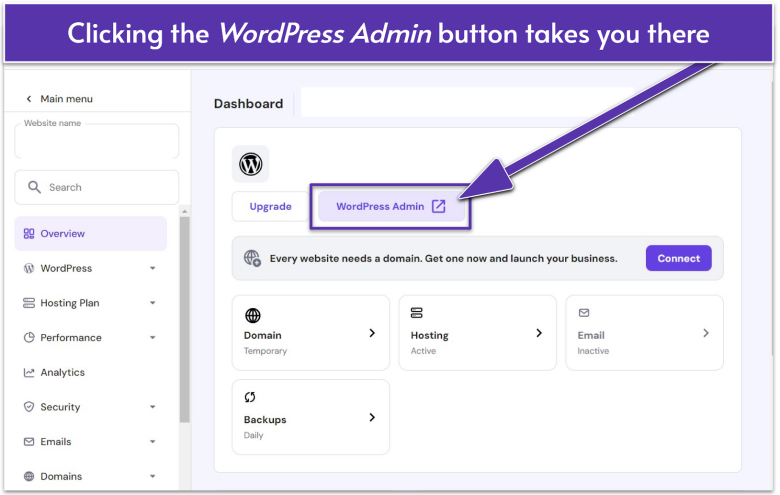
![Hostinger hPanel dashboard]()
I love how easy it is to log into WordPress from hPanel - In the WordPress Admin dashboard, you’ll now need to choose a website builder plugin or a theme with a built-in website builder. Just check to see if the advertised website tools and templates are free to use. Many website builder plugins and WordPress Themes lock templates and advanced tools to paid subscription tiers.
- You can always use the WordPress Block Editor for free, but it can be challenging for beginners. It’s known for being complex and finicky, which can put you at risk of losing your progress or even corrupting your site.
Choose a WordPress Builder and Theme
For my mock book blog, I created a site using the Beaver Builder Plugin (Lite), which is free to use. While the free templates are limited to two generic designs, the range of customization options enabled me to create something quite unique and attractive regardless. If you prefer a limited amount of customization options and a straightforward UI, then the Beaver Builder plugin may be for you. It took me around 2.5 hours to create a unique one-page website using it.- To add a website builder plugin to your WordPress site, navigate to the Plugins menu in the WordPress Admin dashboard. Then, search for your plugin of choice or browse the options by category. Bear in mind that website builders are just one type of plugin.
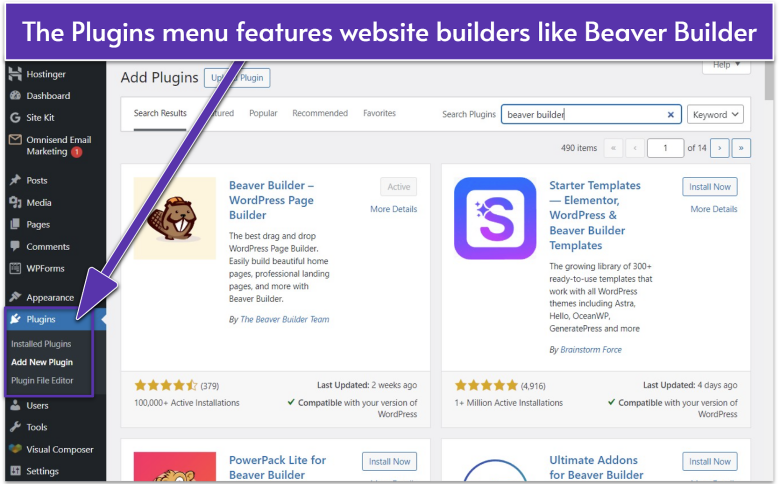
![WordPress plugins menu]()
The Beaver Builder (Lite) plugin is free to use but features optional paid tiers - Once you’ve settled on a website builder plugin, click the Install Now button on the plugin, then Activate once it’s installed.
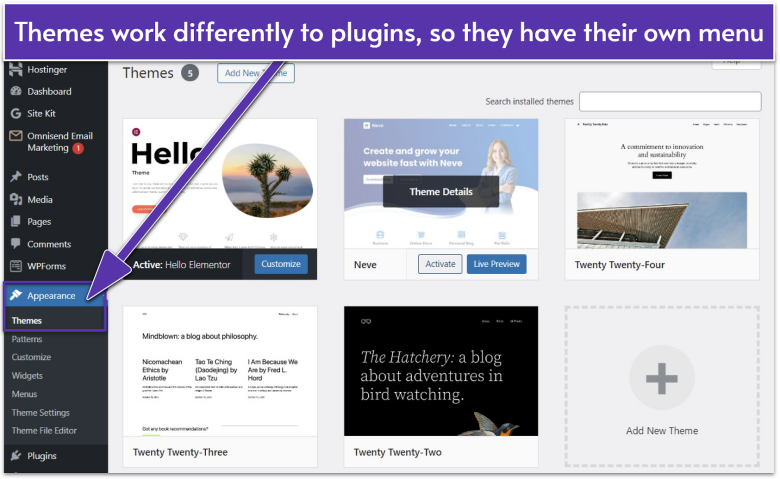
![WordPress Themes menu]()
Hostinger lets you install Neve, Astra, and other popular themes alongside WordPress - If you would prefer to work from a WordPress theme, go to Appearance > Themes just above Plugins. Similar to plugins, you need to click the Activate button on a Theme, then click Customize once you’re done to create and edit your website.
Consider These Useful (Free) Plugins
- MooBerry Books Manager: This plugin is designed to help authors sell their books directly on their site via Amazon or other online e-commerce marketplaces. However, you can also use this plugin to add affiliate links to your recommended books, creating a new revenue stream.
- WordPress Books Gallery: A popular plugin for showcasing books, whether they’re your own or simply your favorites. Like MooBerry, you can also add affiliate links to featured books.
- Yoast SEO: This SEO-optimization plugin helps improve your chances of ranking higher on Google and other search engines. Yoast offers a free tier that covers all of the basic SEO steps you’ll need to do.
- UpdraftPlus: Backing up your book reviews is crucial. With a paid or free plugin like UpdraftPlus, you can back up your site and its content, ensuring your hard work is protected. After all, your published review content is much harder to recover or rewrite than other types of site content.
Step 5: Set Up and Customize the Most Relevant Pages
When setting up your book blog, the most important pages to focus on are those that will engage your readers and provide essential information. For a book blog, must-have pages typically include the homepage, blog, about, and contact pages.
Depending on your niche, you might also want to add pages for reading lists or other content. With WordPress.org and Beaver Builder (Lite), you can easily create these pages and customize them to fit your style.
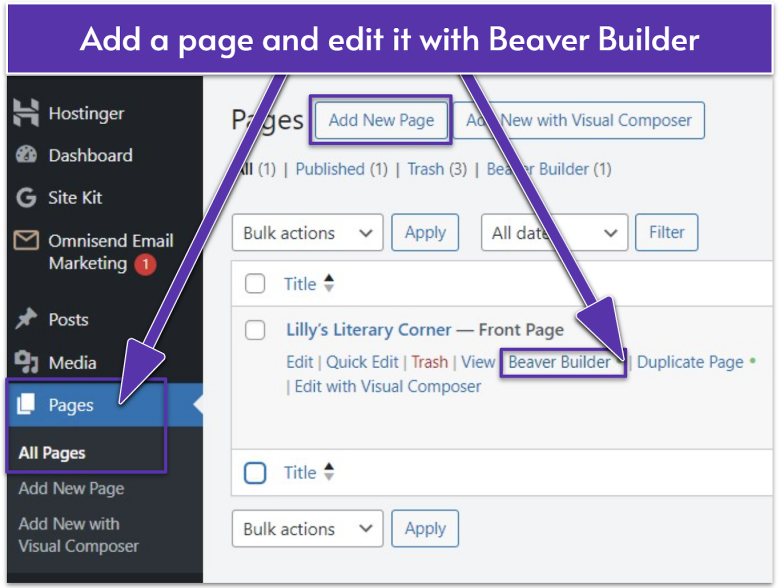
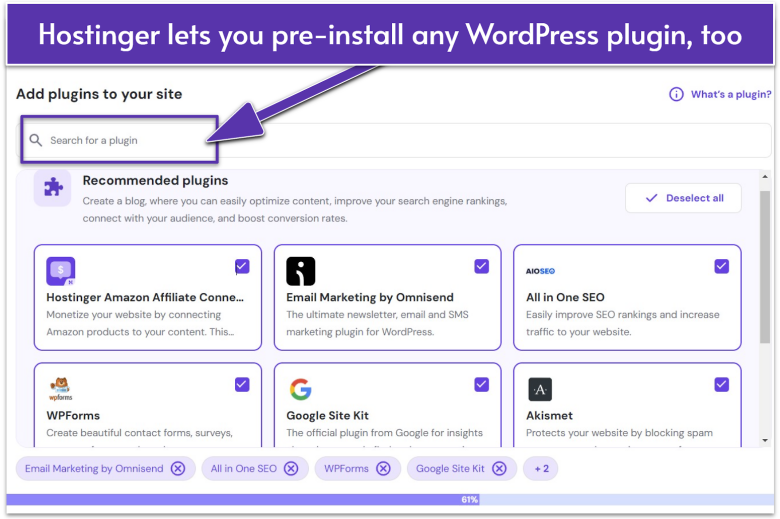
- Add a new page: To start, go to your WordPress dashboard and navigate to Pages > Add New. From here, you can create a new page for each of these key sections. You can then click Beaver Builder to open the website builder’s page editor.
- Choose a template: Beaver Builder offers a selection of free templates. However, to get premium templates, you’ll need to sign up for a paid Beaver Builder subscription.
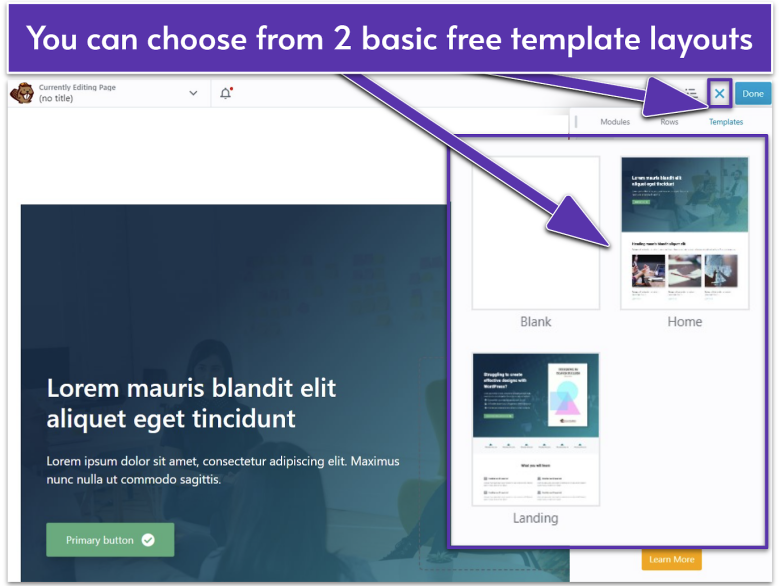
![Beaver Builder free template layouts]()
Basic templates can be customized with images, fonts, colors, and effects - Customize the layout: Beaver Builder’s drag-and-drop interface makes it simple to change the structure of your pages. For instance, you can move text blocks around, adjust image placements, or add a contact form.
- Customize your blog: Personalize the fonts, colors, and images to reflect your book blog’s style. To change these elements, click on any section or block in the Beaver Builder. You’ll see a menu pop up, and by clicking Settings, a more comprehensive editing panel will appear.
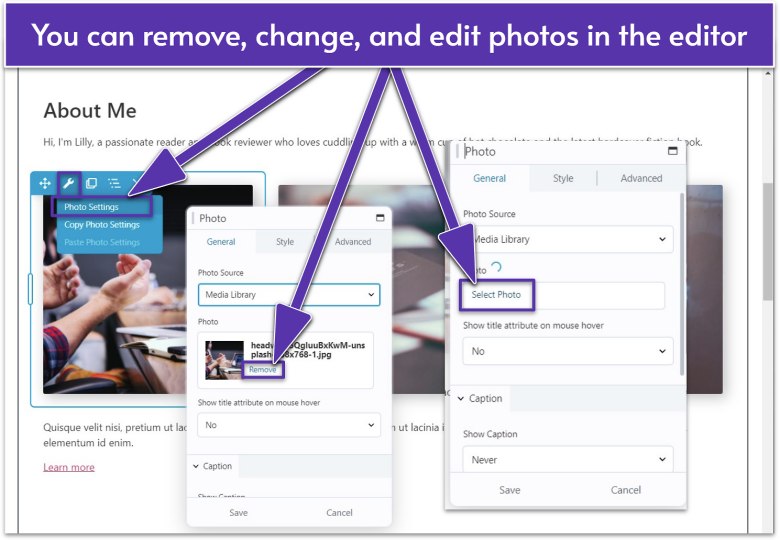
![Beaver Builder photo editor]()
The Beaver Builder interface is quite simple: just click the block and start customizing - Change the template images: You can update images by clicking the image block, removing the current template image, and selecting a new photo.
- Adjust your fonts and colors: Select text blocks and use the style options to match your blog’s branding. You can change your font, font size, and color, add a drop shadow, and more to better reflect your unique style and personality.
- Direct your domain to your homepage: You also want to make sure that your domain is directed to the correct homepage. You can do this by going to Settings > Reading, clicking a static page, and choosing your homepage from the drop-down. Then, test if it’s working by clicking Visit Site in the top-right corner of your WordPress Admin dashboard.
Step 6: Revise, Test, and Publish Your Book Blog Site

- Start by reviewing all of your content to confirm that it displays correctly on both desktop and mobile screens. This step is crucial because many visitors will access your blog on mobile devices, and you want their experience to be seamless.
- If your blog includes e-commerce features, such as a shop for affiliate products or selling books, be sure to test these as well. Try making test purchases to see if the process works smoothly from start to finish.
- For blogs with scheduling features, such as event sign-ups or newsletters, make sure these also function correctly. Sign up and send a test email to your email account.
- Test all buttons and forms to ensure they direct users to the right pages or actions. Also, check for any broken links that might disrupt the user experience.
- As a final touch, run a speed test on your blog to make sure it loads quickly. A fast-loading site keeps visitors engaged and improves your search engine ranking.
- You can use free tools like Google PageSpeed Insights or GTmetrix to test your site’s performance.
If your site is a bit slow, quick fixes like compressing images, minimizing the use of heavy plugins, or enabling browser caching can make a big difference.
How To Promote Your Book Blog Website
There are lots of effective ways to promote your book blog, and many of them can also create revenue streams. Here are a few book blog promotion ideas to get you started.
Create Engaging Content for Your Book Blog
One of the best ways to promote your book blog is by creating engaging, niche-specific content. Tailor your posts to the type of readers you want to attract, whether that’s young adult fiction fans, sci-fi enthusiasts, or mystery lovers. The key is to focus on writing content that resonates with your target audience.Types of Book Blog Posts
Diversify your content with various post types. Along with book reviews, consider the following:- Author interviews
- Reading lists
- Personal reflections on your reading habits
- Character analyses
- Movie adaptation comparisons
- Top 10 lists
- Anything else new or unique, really
Tips for Writing Effective Book Reviews:
- Get access to advanced reviewer copies (ARCs). Some publishers and authors make their books available to professional reviewers for free for marketing purposes. Platforms like NetGalley are a great way to get access, and signing up is free.
- For book reviews, aim for a balanced approach. Discuss the plot and key elements without giving away spoilers, so your readers can engage with your thoughts without compromising the story.
- Be sure to highlight both the strengths and weaknesses of each book to help your audience make informed reading decisions. Offering an honest critique helps build trust with your readers and keeps them coming back.
- Try to use grammar- and spell-checking tools to ensure your content is error-free. This attention to detail builds authority and rapport with your readers.
- Consider using AI tools to structure or expand your book reviews. However, make sure all the details are correct and the writing aligns with your personal, distinctive style.
Engage With the Book Blogging Community
Connecting with other bloggers is a valuable way to grow your audience. Commenting on other blogs, participating in book events, and joining blog tours can help you establish a presence in the community. These collaborations can lead to more exposure and opportunities for your blog.Leverage Social Media Platforms
Promoting your blog on social media can greatly increase your reach:- Consider using a recommended social media management tool to help you launch successful marketing campaigns.
- Decide which social media platforms you want to invest in. Instagram and Twitter are particularly effective places for book bloggers to market their reviews and blog content.
- Alternatively, consider starting an email marketing campaign or setting up a newsletter that your readers can subscribe to.
- Or hire a freelance expert to assist you with social media management or marketing.
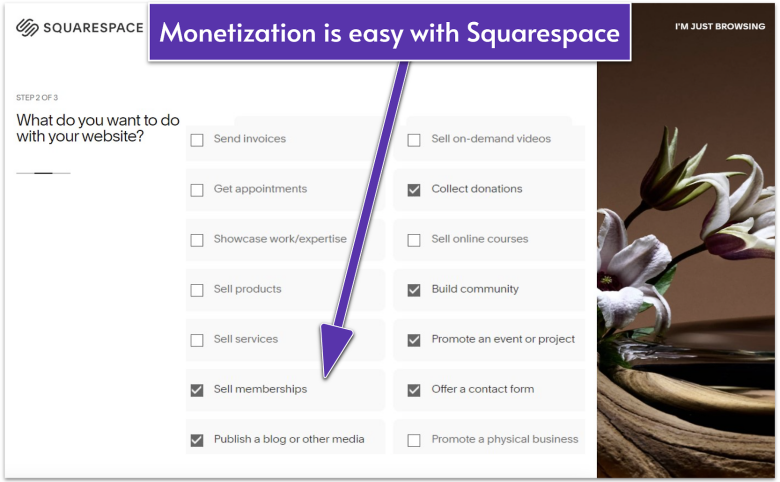
An Easier Alternative To Get a Book Blog Online
If you’re looking for a straightforward way to start your book blog without worrying about the technical aspects, Squarespace is a great choice. Unlike the options we’ve discussed above – where you’d need to set up hosting, purchase a domain separately, or install plugins – Squarespace bundles everything you need in one neat package. So you can focus on creating content.
- Email Marketing Integration: You can integrate an email marketing service directly into your site, making it easy to build a list of subscribers.
- Blogging Features: Squarespace’s blogging features include content scheduling, tagging, and categories, which can help you organize your book reviews or niche discussions.
- Social Media Tools: You can also use Squarespace’s built-in social media sharing tools to promote your posts across platforms effortlessly.