
Last updated: June 09, 2025
IN THIS GUIDE
Short on Time? Quick Steps to Add Your Facebook Pixel to Wix
- Make sure your site is on Wix’s Premium plan and connected to a domain.
- Go to Settings > Marketing Integrations in your Wix Dashboard.
- Click Connect under Meta Pixel & CAPI.
- Click Connect to Facebook under Connect Meta Pixel & CAPI.
- Choose your profile in the pop-up and sign in.
- Grant the necessary permissions to Wix Apps.
Step 1. Check Your Requirements in Wix
Before you start, it’s important to confirm you meet Wix’s basic requirements. Here’s what I recommend checking first:
- Wix Premium plan subscription. Facebook Pixel integration typically requires a paid Wix plan so you can connect your own domain.
- Domain. If you’re using a free Wix URL (e.g., username.wixsite.com), the Pixel can’t fully track important site data. Make sure your custom domain is set up.
- Facebook Pixel. You’ll want to have a Pixel already created in Facebook Events Manager.
If you haven’t created a Pixel yet, head to Facebook’s Ads Manager and go to Events Manager. On the Overview page, click Connect Data > Web > Connect. Enter a name for your pixel and click Create Pixel. Once that’s done, you can move on to the next steps.
Step 2. Connect to Meta Pixel & CAPI
Now that you’ve confirmed you have a premium plan and a connected domain, you’re ready to open Wix’s Meta Pixel integration settings.
- Log in to Wix and select the site you want to track.
- Click Settings in the left sidebar.
- Click on Marketing Integrations at the bottom of the settings list.
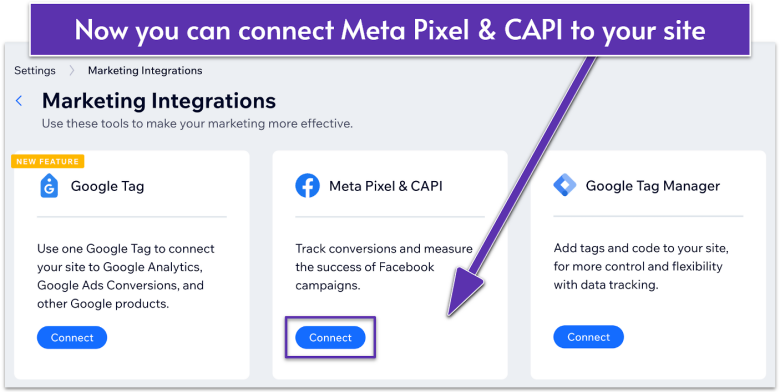
![Marketing Integrations list in Wix Dashboard, highlighting Connect button for Meta Pixel & CAPI]()
- Click Connect where it says Meta Pixel & CAPI.
Step 3. Add Your Facebook Pixel to Your Wix Site
With the Meta Pixel & CAPI integration page open, adding your Pixel ID is super straightforward.
- Click Connect to Facebook to begin the setup process.
- Choose your profile in the pop-up and click Next.
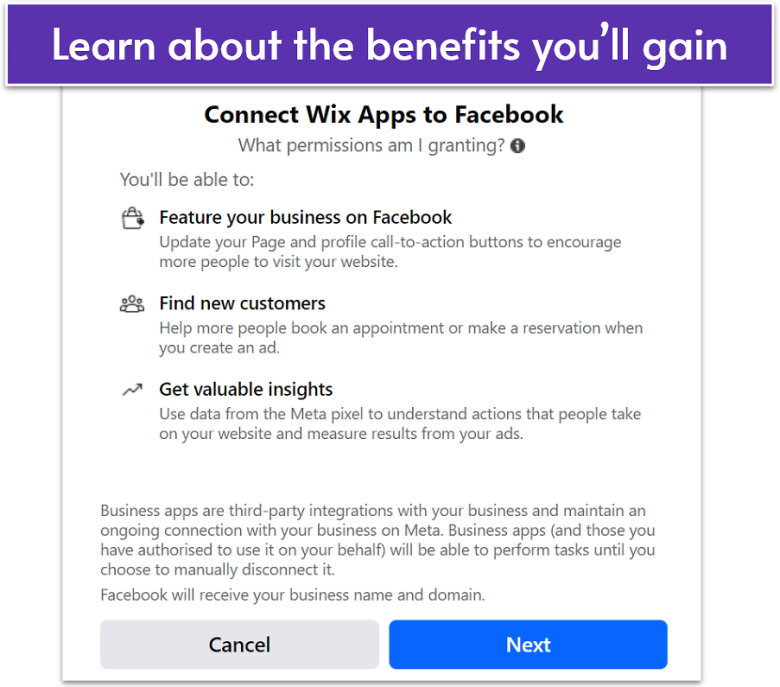
![Pop-up window describing features available when connecting Wix Apps to Facebook]()
- Review the permissions you’ll be granting when you connect Wix Apps to Facebook. Click Next to continue.
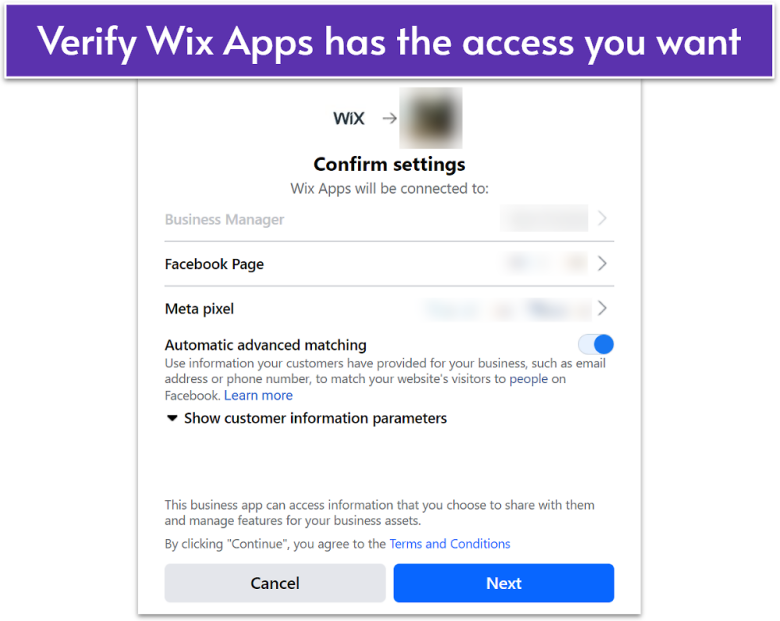
![Confirmation page for connecting Wix Apps to Facebook Page and Meta Pixel]()
- In the Confirm settings screen, make sure the following are connected to the correct accounts:
- Business portfolio
- Facebook Page
- Meta Pixel
- Click Continue if all your settings are correct.
- Review the details in the What is Wix Apps allowed to do? screen. Click Next to start linking your accounts.
- Click Done after finishing the setup.
Disconnect Your Wix Site from Facebook Pixel
Do you need to disconnect your site from the Meta Pixel & CAPI integration? No worries – it’s a quick process you can handle right from your Wix dashboard. Just follow these steps:- Go to Settings, then click Marketing Integrations in your Wix Dashboard.
- Click View under Meta Pixel & CAPI.
- In the top-right corner, click More Actions
. - Select Delete from the dropdown.
- Click Disconnect to confirm.