Last updated: May 16, 2025
IN THIS GUIDE
Step 1. Open Your Site’s Wix EditorStep 2. Choose and Add a Wix Lightbox Pop-Up TemplateStep 3. Customize the Pop-Up ElementsStep 4. Change the Pop-Up Background for a Branded LookStep 5. Resize and Align the Pop-Up for Better VisibilityStep 6. Add Animation to Your Wix Pop-Up for EngagementStep 7. Customize the Pop-Up Overlay and Close OptionsStep 8. Set When and Where Your Wix Pop-Up AppearsStep 9. Optimize Your Wix Pop-Up for Mobile UsersStep 10. Preview and Publish Your Wix Pop-UpHow To Edit a Wix Pop-UpHow To Remove a Wix Pop-UpYour Wix Pop-up Is Live and Ready To GoFAQ
Short on Time? Follow These Simple Steps To Add a Pop-Up on Wix
- Open your site’s Wix Editor.
- Click Add Elements on the left side of the editor.
- Hover over Interactive in the Add Elements menu.
- Hover over a pop-up type under Lightboxes.
- Click a pop-up template to add it onto your site.
- Customize your pop-up.
Step 1. Open Your Site’s Wix Editor
To find a Wix pop-up template and add one to your site, you’ll need to be in the Wix Editor.- Log in to your Wix account.
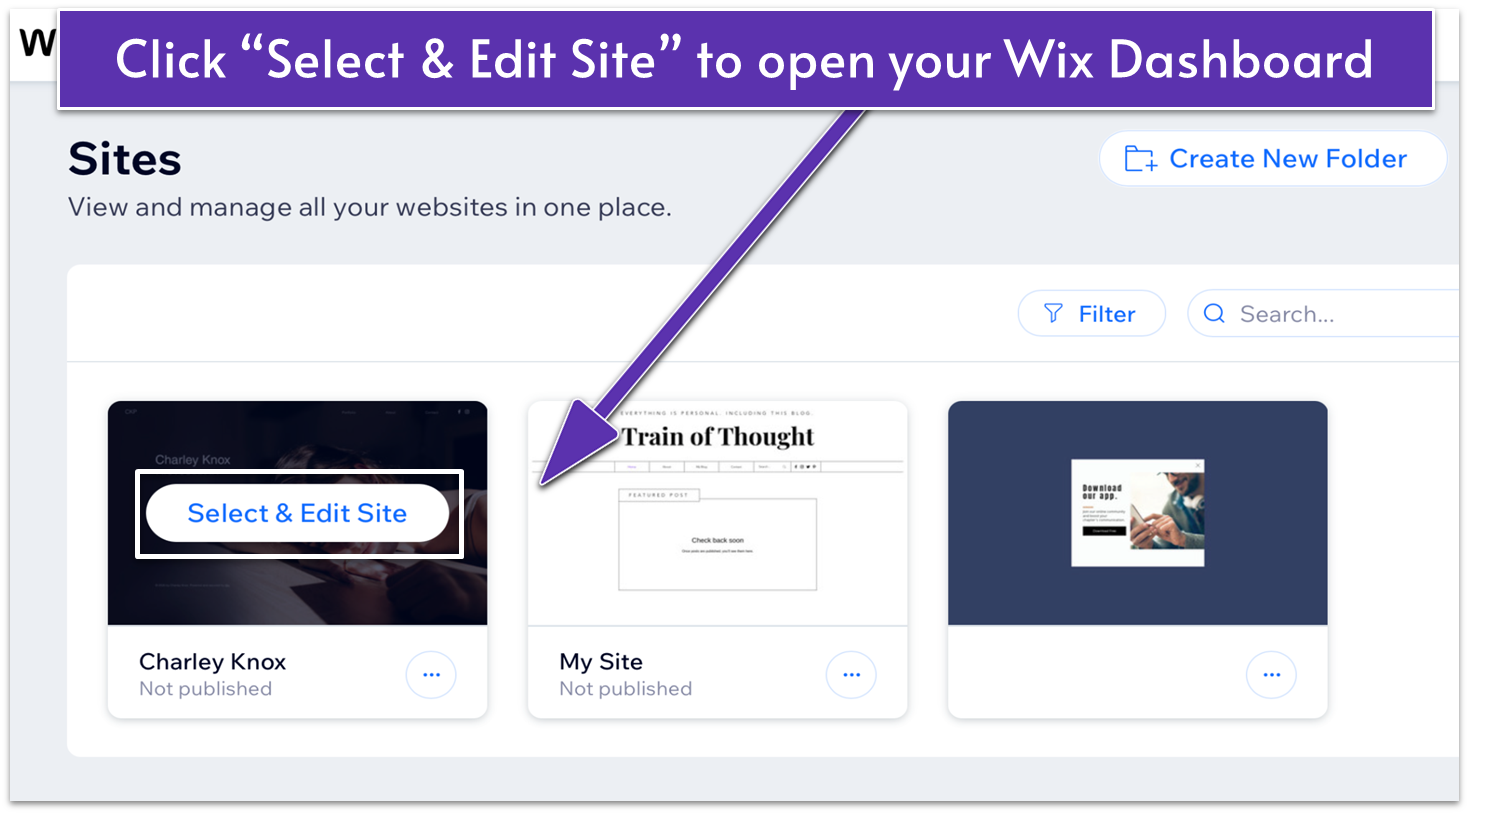
![Wix Sites page, pointing to "Select & Edit Site" button]()
- On the Sites page, hover over your selected website and click Select & Edit Site.
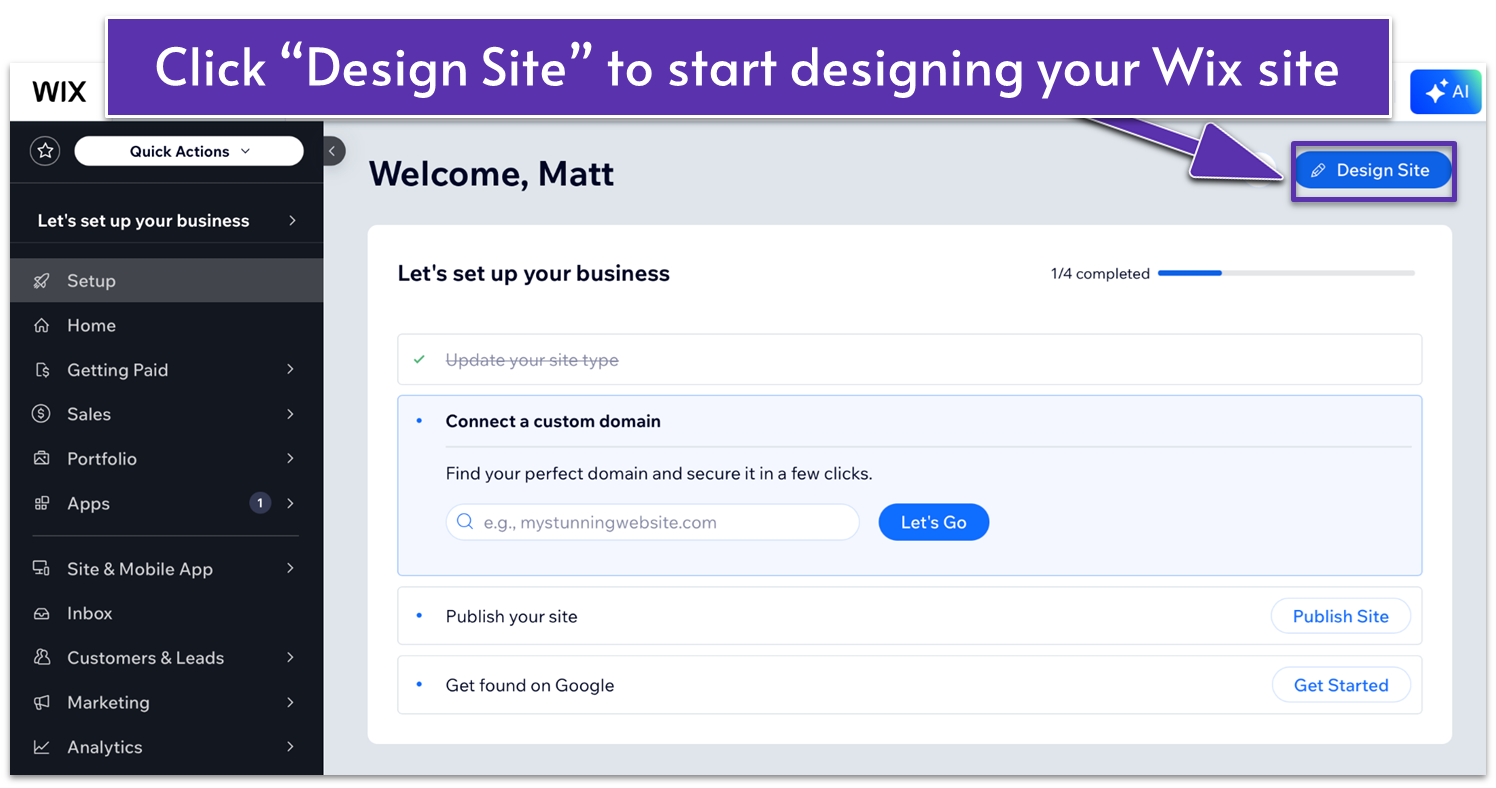
![Wix Dashboard, highlighting "Design Site" button]()
- Click Design Site in the Wix Dashboard to open the Wix Editor.
Step 2. Choose and Add a Wix Lightbox Pop-Up Template
Wix provides several pop-up template options, each with a unique layout and based on popular examples.
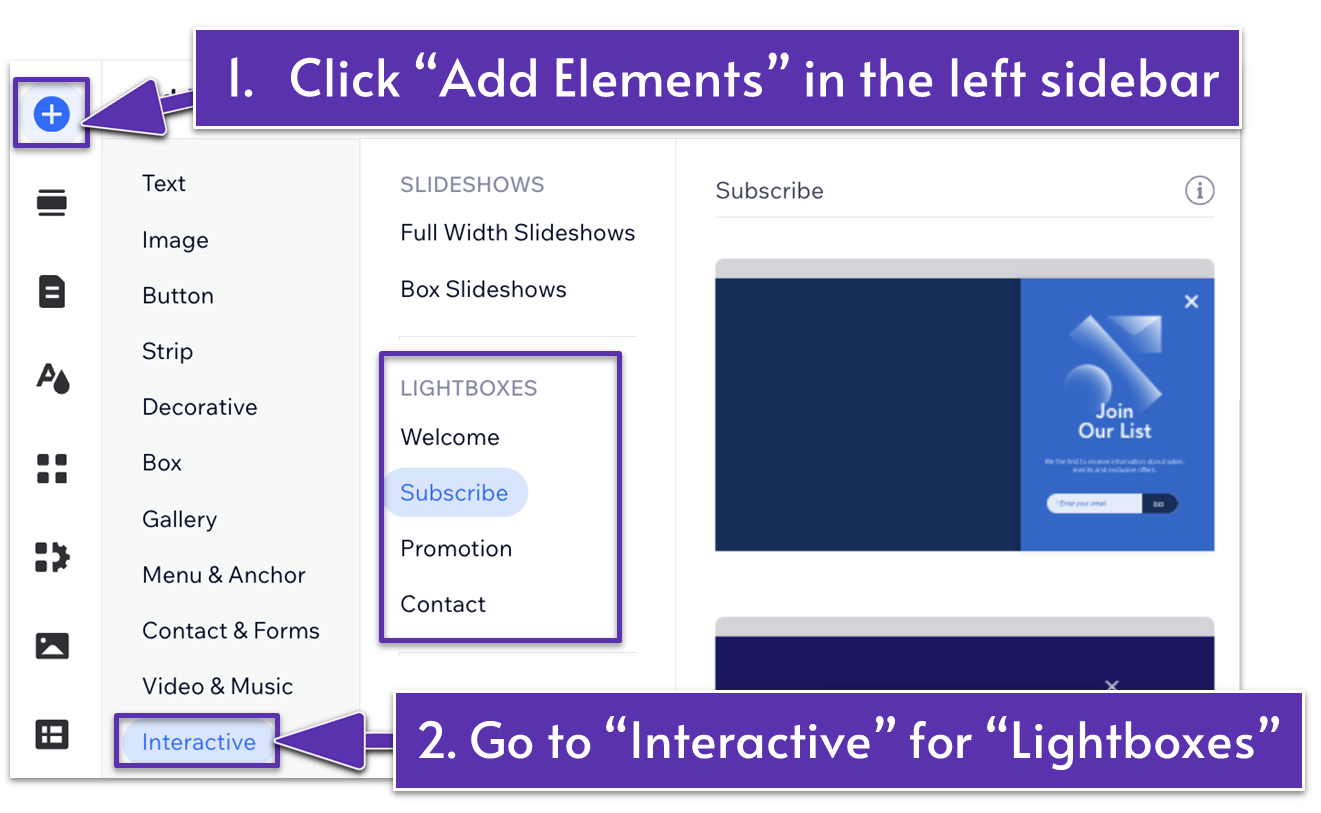
- Click Add Elements
on the left side of the editor. - Click Interactive from the list of options.
- Select a type of pop-up under Lightboxes. Here are the four pop-up categories:
- Welcome – Ideal for announcements and greeting visitors.
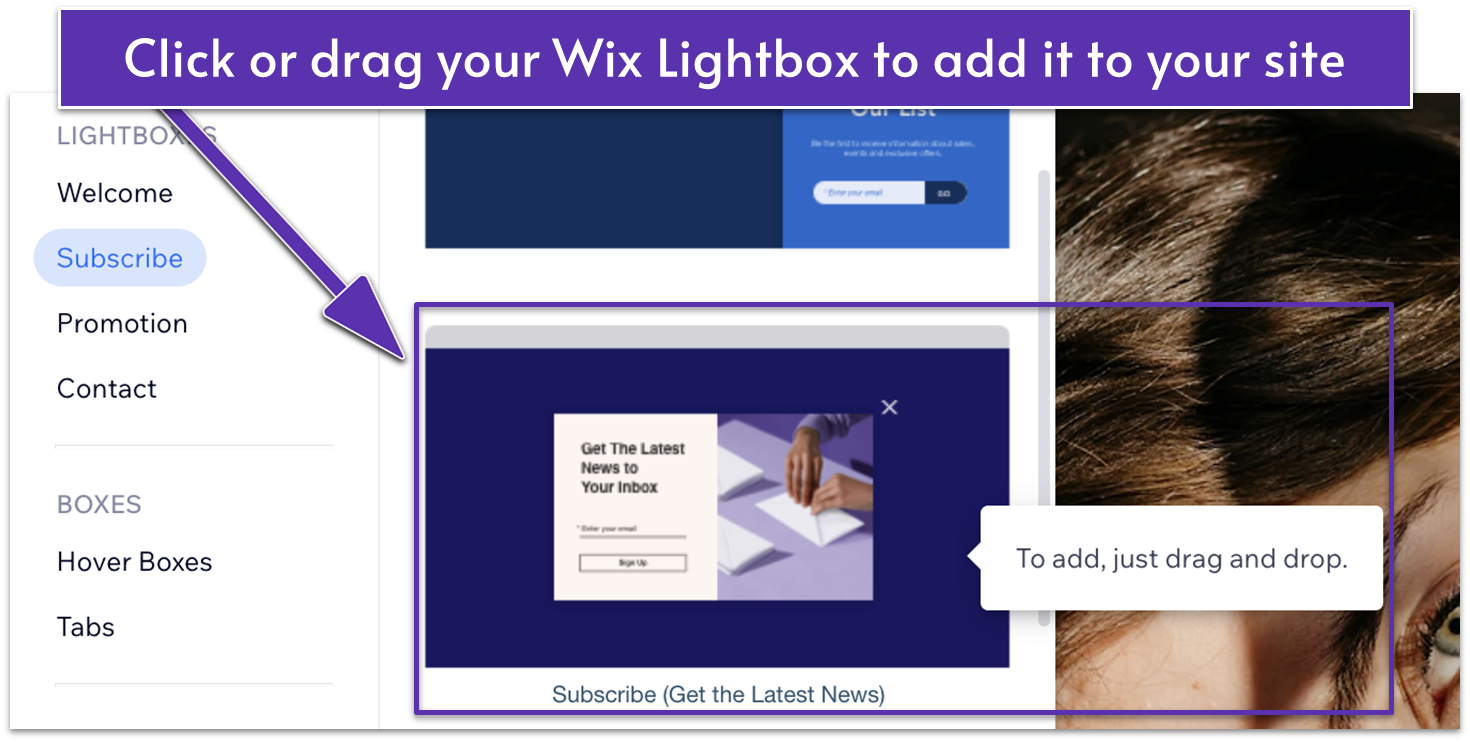
- Subscribe – Perfect for newsletter contact forms or free download offers to grow your email list.
- Promotion – Great for sharing sales or new product launches.
- Contact – Useful for displaying your contact info and your business’s opening hours.
![Wix Lightbox templates with "To add, just drag and drop" message displayed]()
- Click or drag and drop the template to your Wix website. The editor will automatically switch to Lightbox Mode.
Step 3. Customize the Pop-Up Elements
Since you’re using a Wix Lightbox template, you may want to add, edit, or remove elements like text, video, images, forms, and buttons. I’ll share an example using a newsletter subscription pop-up for a photographer.Editing the Text in the Pop-Up Template
- Click on the text element.
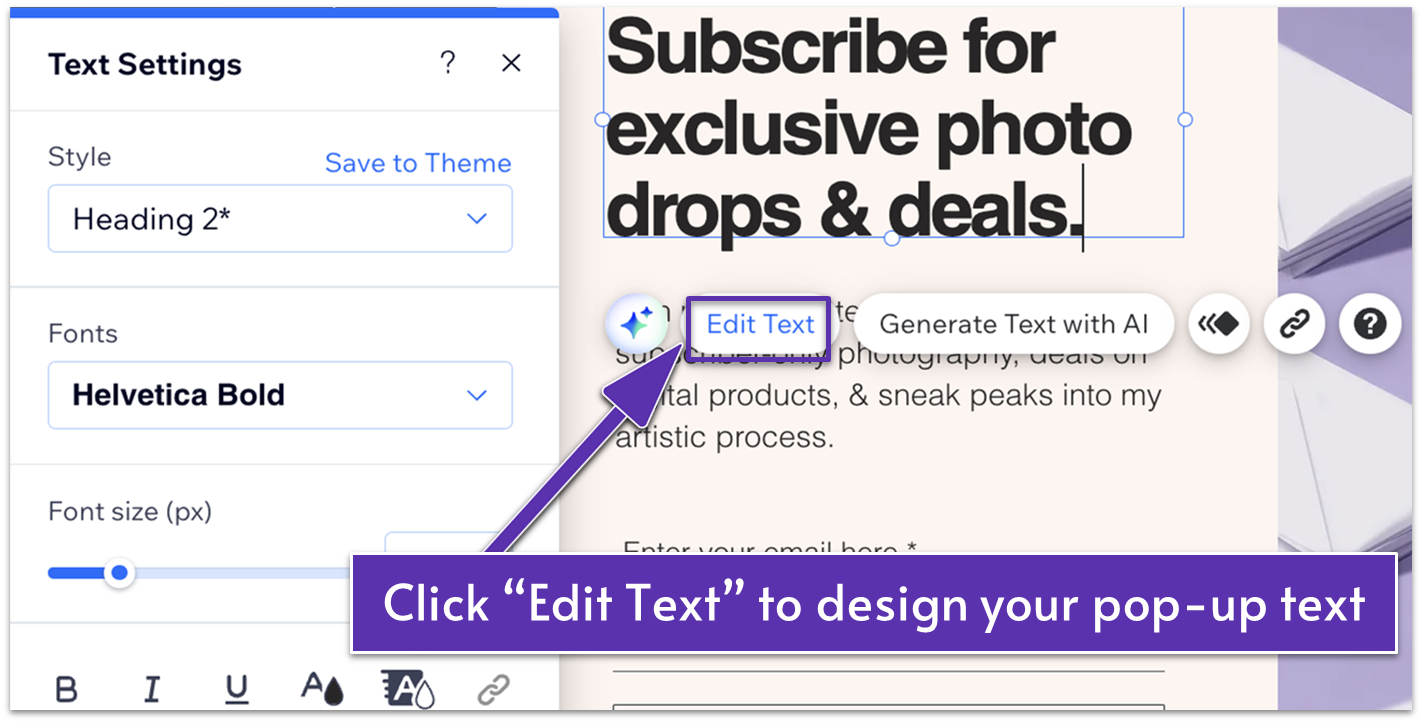
![Text Settings menu for a Wix Lightbox, highlights "Edit Text" button on a text box]()
- Click Edit Text in the menu that appears.
- Type in your new text.
- Use the design tools in the Text Settings panel to customize the text’s font, size, color, and alignment.
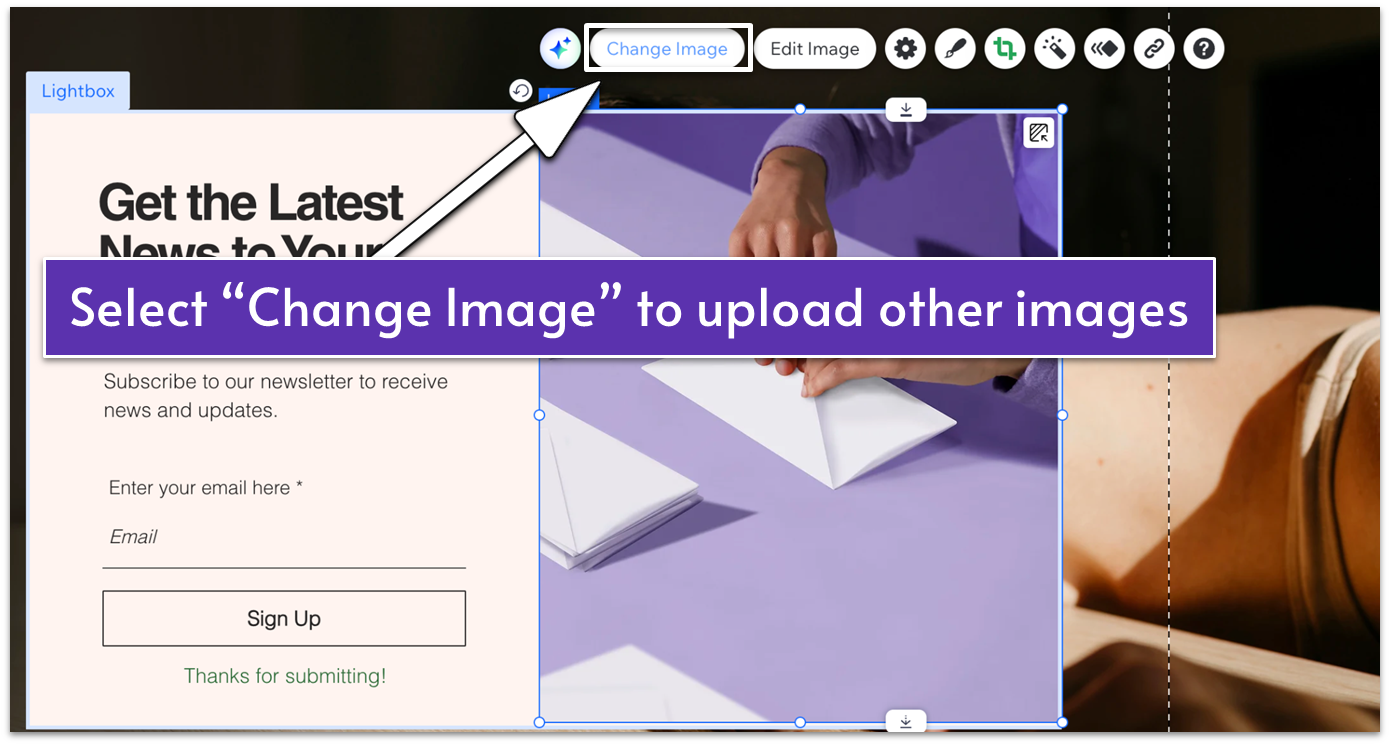
Editing the Image in the Pop-Up Template
- Click the image.
![Wix Lightbox with image selected, highlighting "Change Image" button]()
- Click Change Image in the menu.
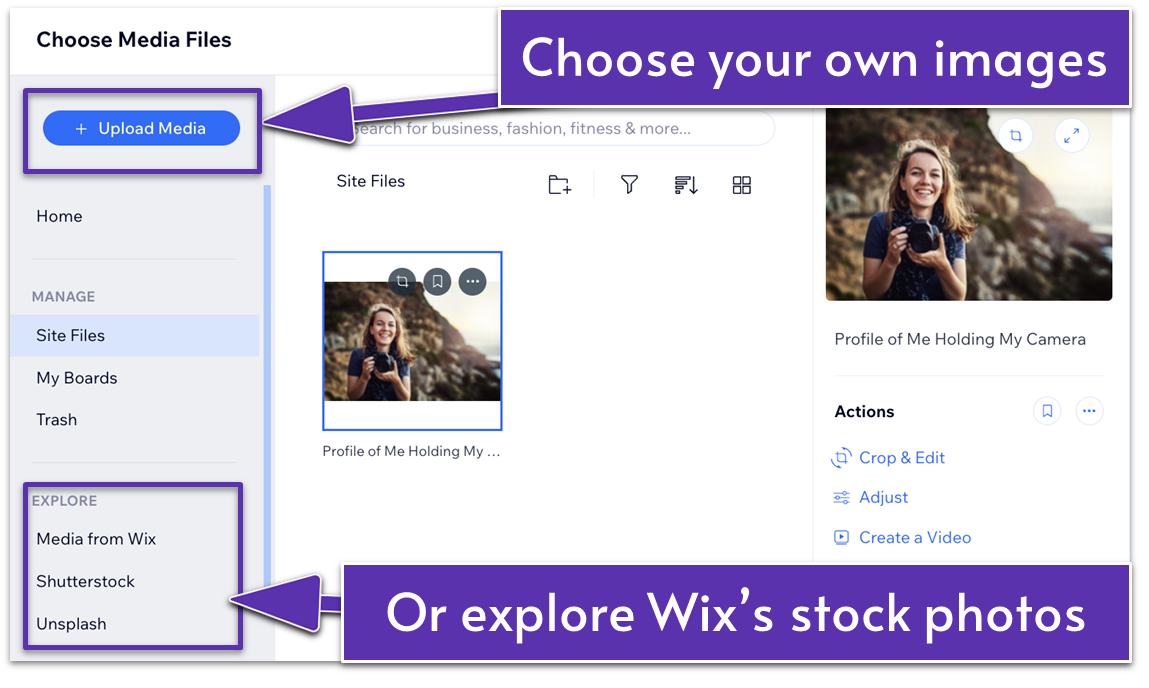
![Wix Media Manager, arrow points to "Explore" section with stock image options. Points to "Add to Page" button]()
- Upload your own photo or choose a free stock image from Wix or Unsplash.
Editing the Form in the Pop-Up Template
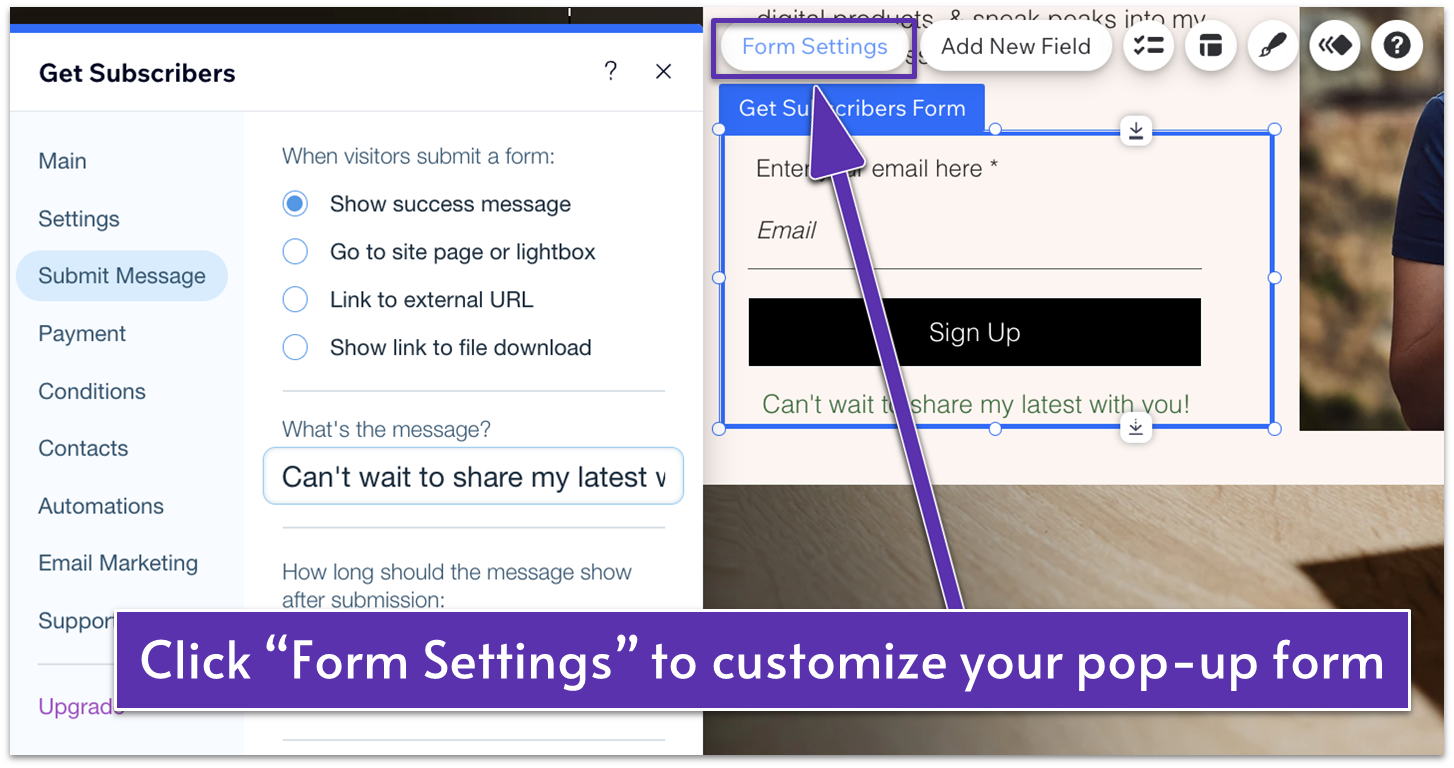
- Click the form element.
![Form Settings pop-up menu for a Wix Lightbox, highlights "Form Settings" button, "Submit Message" and "Show success message" options selected]()
- Click Form Settings from the pop-up menu.
- Choose Submit Message and type in your custom success message.
- Go back to the pop-up menu and click Add New Field to add fields to the form. You can also double-click the existing email field to open its Text Input Settings panel to edit the field type and title.
Editing the Submit Button in the Pop-Up Template
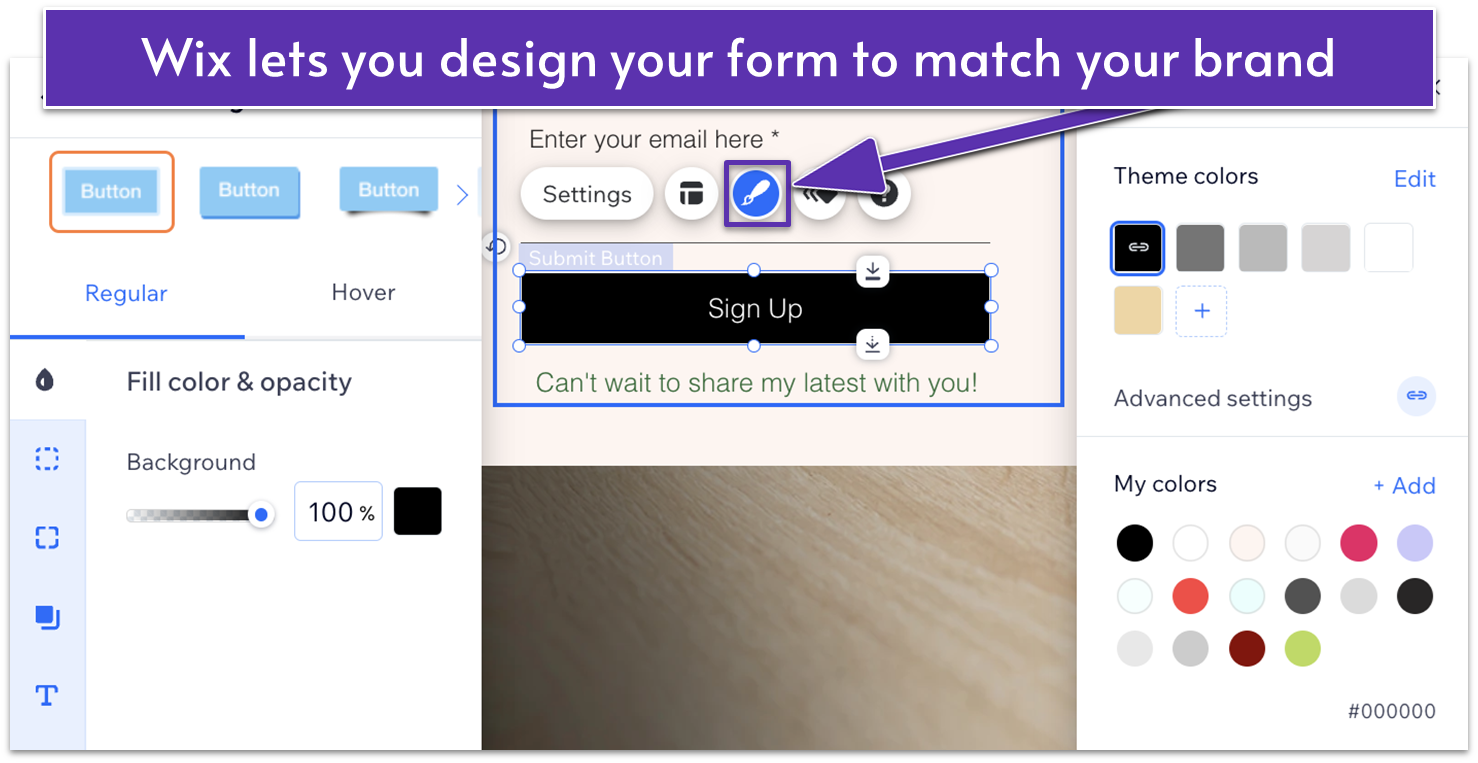
- Select the button.
- Click Settings to update the submit button text, link, or function.
![Wix Lightbox Button Design menus with "Design" paintbrush icon highlighted]()
- Click Design
in the menu to update the button color, size, and shape.
Adding New Elements to the Pop-Up
- Click Add Elements in the left sidebar.
![Wix Lightbox with "Attach to Lightbox" hover message over a star-shaped element]()
- Drag and drop elements like text, buttons, forms, or images into your pop-up. Make sure you see “Attach to Lightbox” in the pop-up before you drop the element.
Need more support with your pop-up?
If you get stuck, click
Step 4. Change the Pop-Up Background for a Branded Look
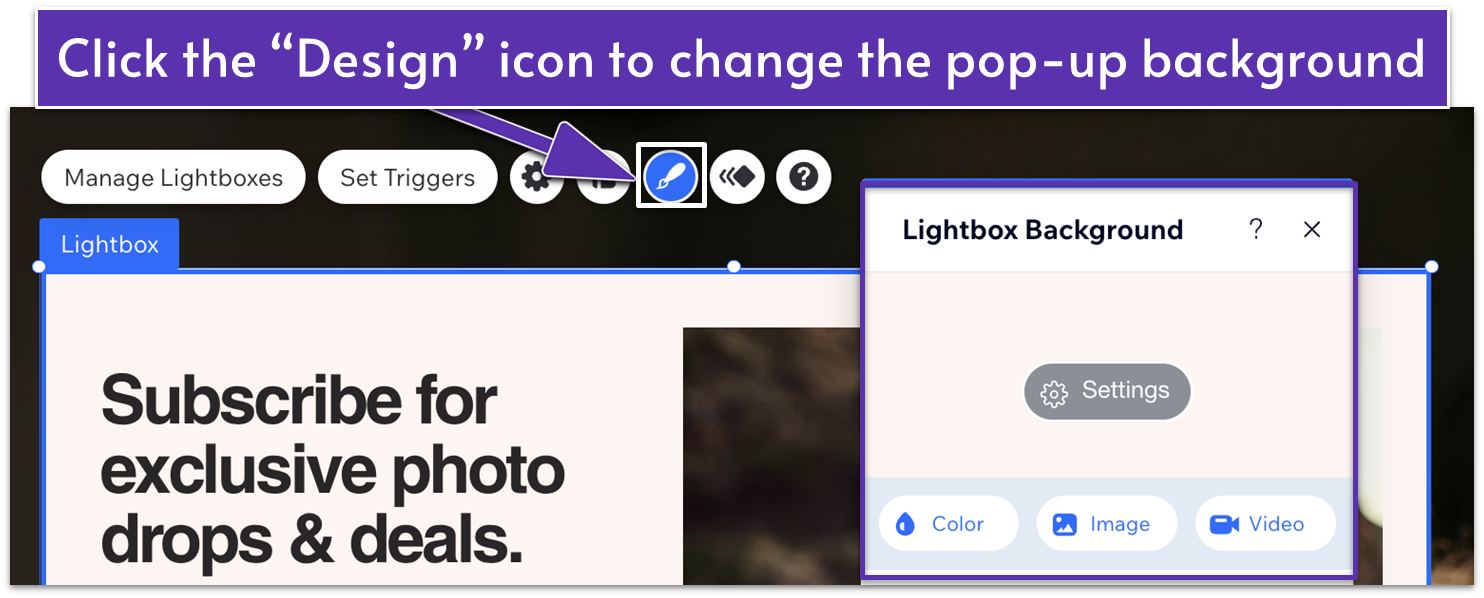
Make your pop-up stand out with a background that fits your brand. Wix lets you choose a color, image, or video as your background.- Click on the pop-up background (not on an element like text or image).
![Wix Lightbox Background "Design" settings menu, highlighting "Color," "Image," and "Video" buttons]()
- Click Design
to open the Lightbox Background panel. - Choose a color, image, or video for your background.
- Adjust Lightbox Background settings such as color, opacity, and image positioning.
Step 5. Resize and Align the Pop-Up for Better Visibility
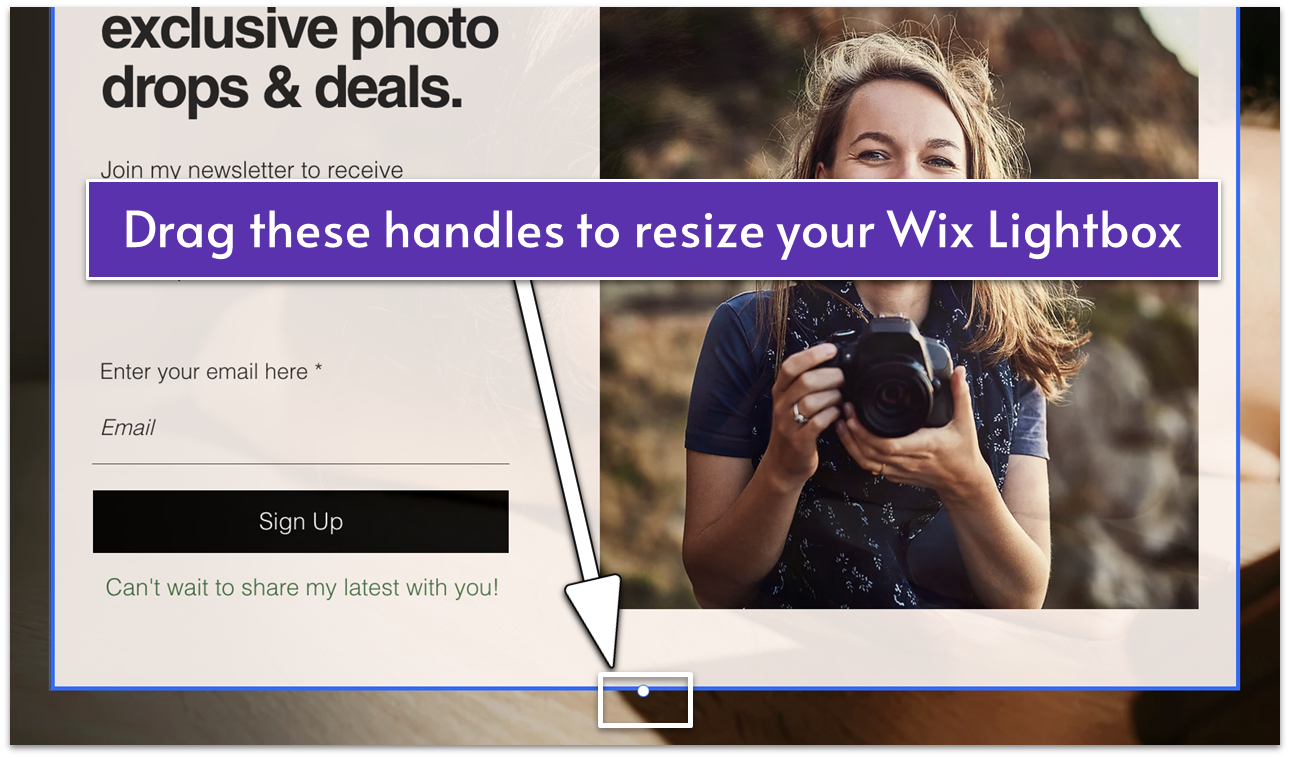
Make sure your pop-up looks great on desktop by adjusting its size and position. Wix allows you to resize the lightbox and choose where it appears on the page.Resizing the Pop-Up
- Click on the lightbox to select it.
![Wix Lightbox selected with blue outline]()
- Drag the blue outline to resize the pop-up.
Aligning the Pop-Up
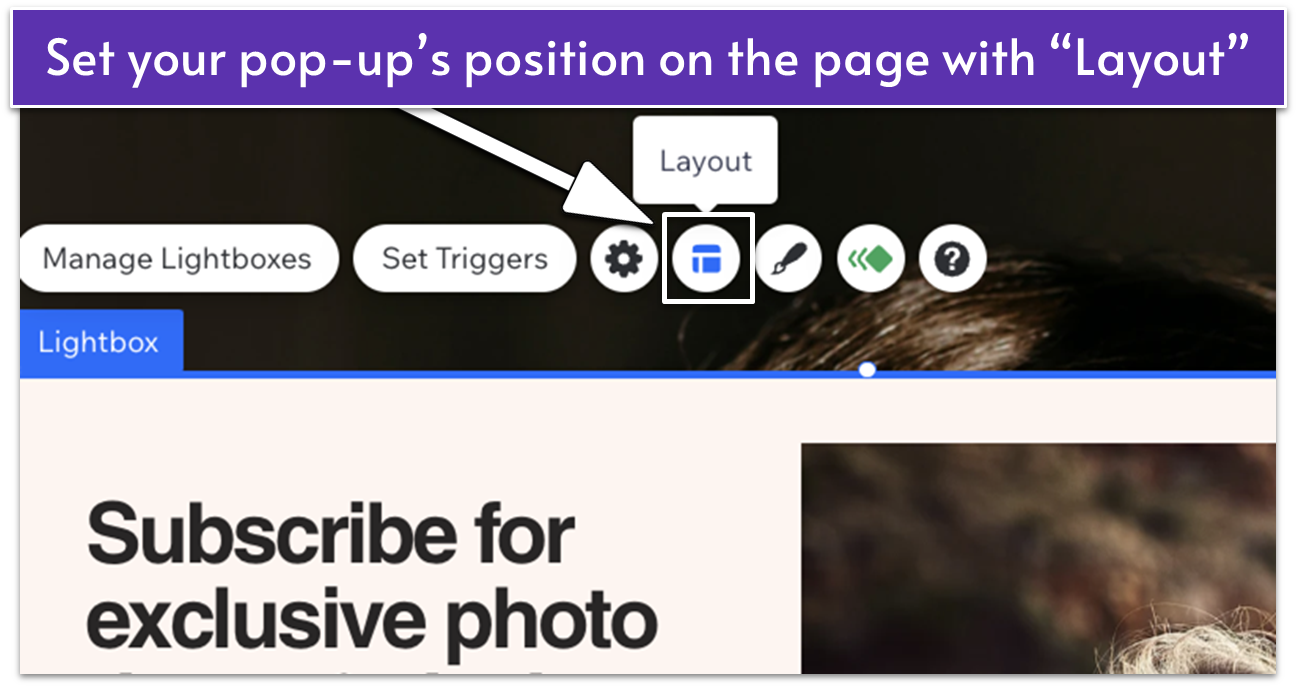
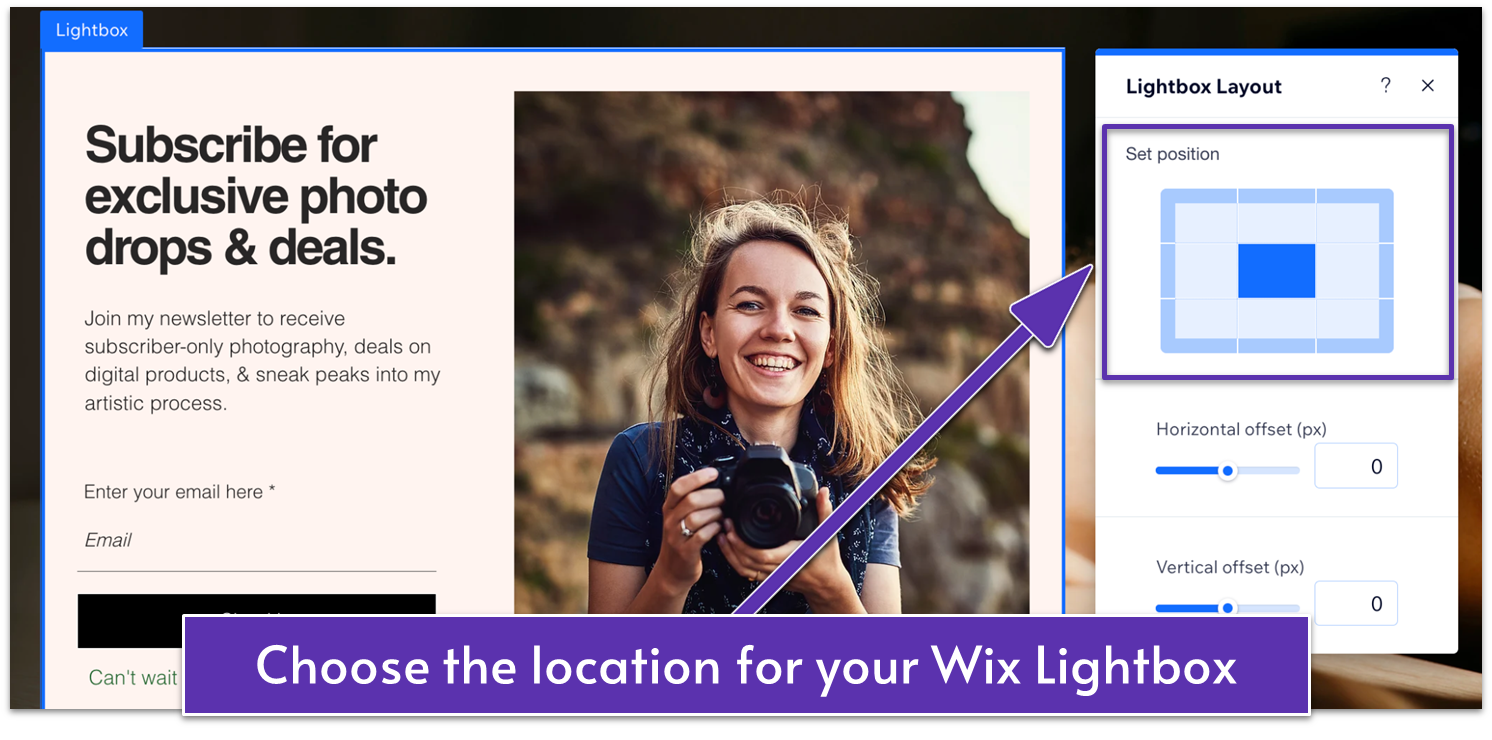
- Click Layout
to open the Lightbox Layout panel.
![Wix Lightbox selected, Lightbox Layout menu, highlighting "Set position" settings]()
- Adjust the Lightbox Layout settings:
- Set Position – Choose where the pop-up appears (center and along the edges).
- Horizontal & Vertical Offsets – Fine-tune the pop-up’s placement by moving it left, right, up, or down.
Step 6. Add Animation to Your Wix Pop-Up for Engagement
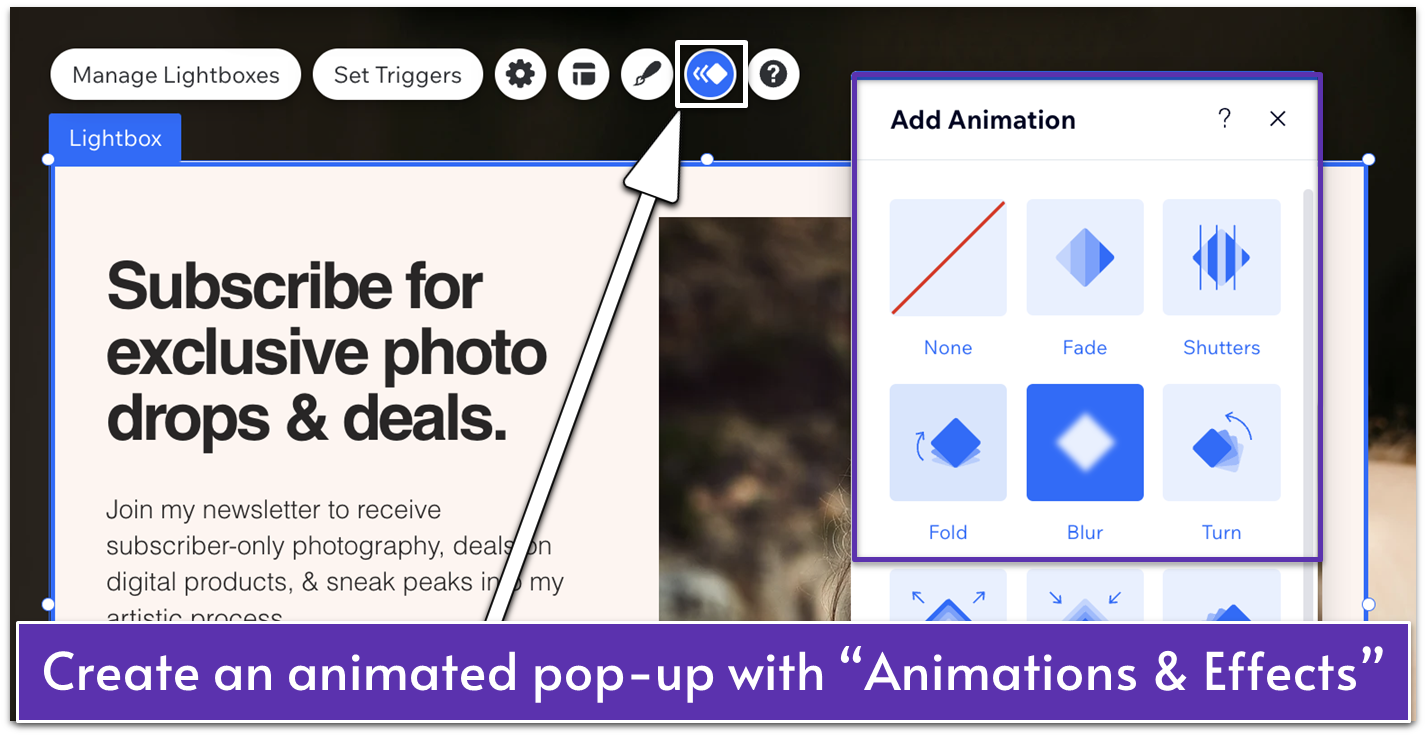
Enhance your pop-up by adding an animation effect when it appears. Subtle animations can make your design feel more polished without distracting visitors.- Click on the lightbox to select it.
![Wix Lightbox selected, points to "Animations & Effects" icon and "Add Animation" effect options]()
- Click Animation & Effects
to open the Add Animation panel. - Choose your preferred animation effect (e.g., Fade, Glide, Float).
Step 7. Customize the Pop-Up Overlay and Close Options
The overlay is the area around your pop-up that appears over the rest of your website. It helps visitors focus on your pop-up by dimming or covering the background.Changing the Overlay Background
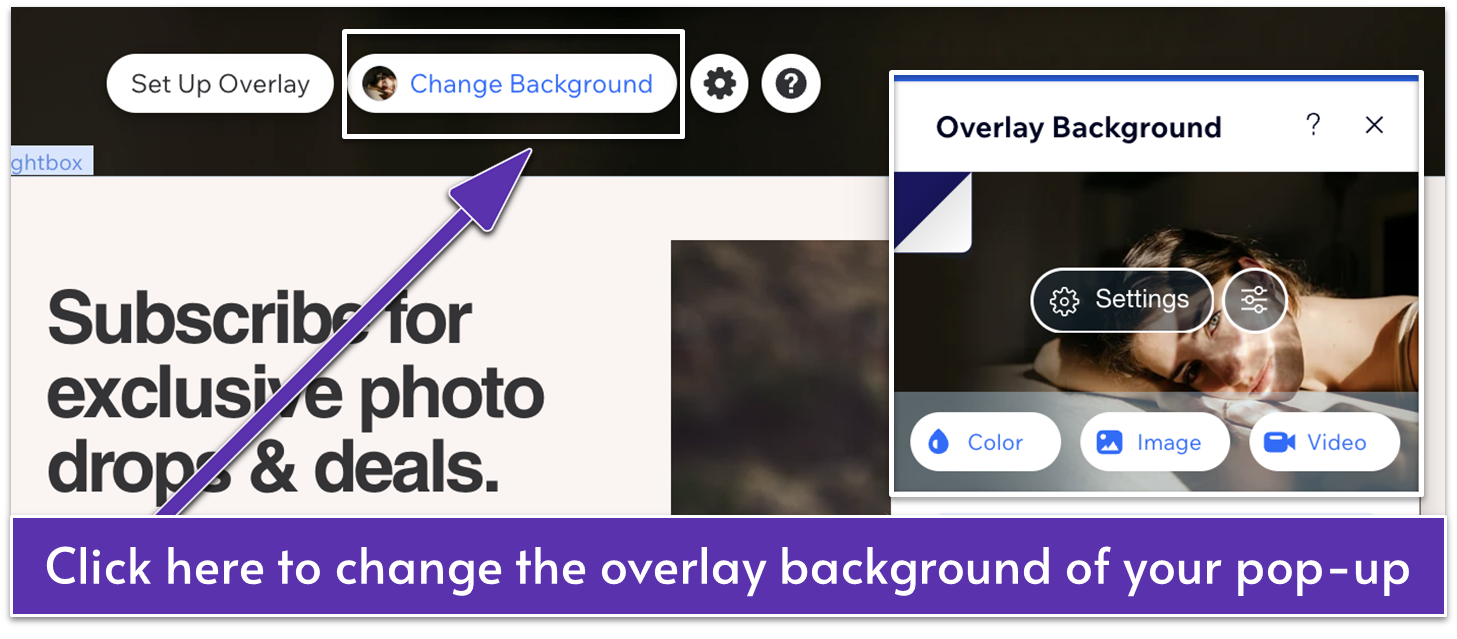
- Click anywhere outside the pop-up (on the overlay).
![Pop-up menu for Overlay Background on a Wix Lightbox, points to "Change Background," "Color," "Image," and "Video" buttons]()
- Click Change Background to choose a color, image, or video for the overlay.
- Adjust overlay background settings like opacity, color, scale, and positioning.
Enabling Click Outside to Close the Pop-Up
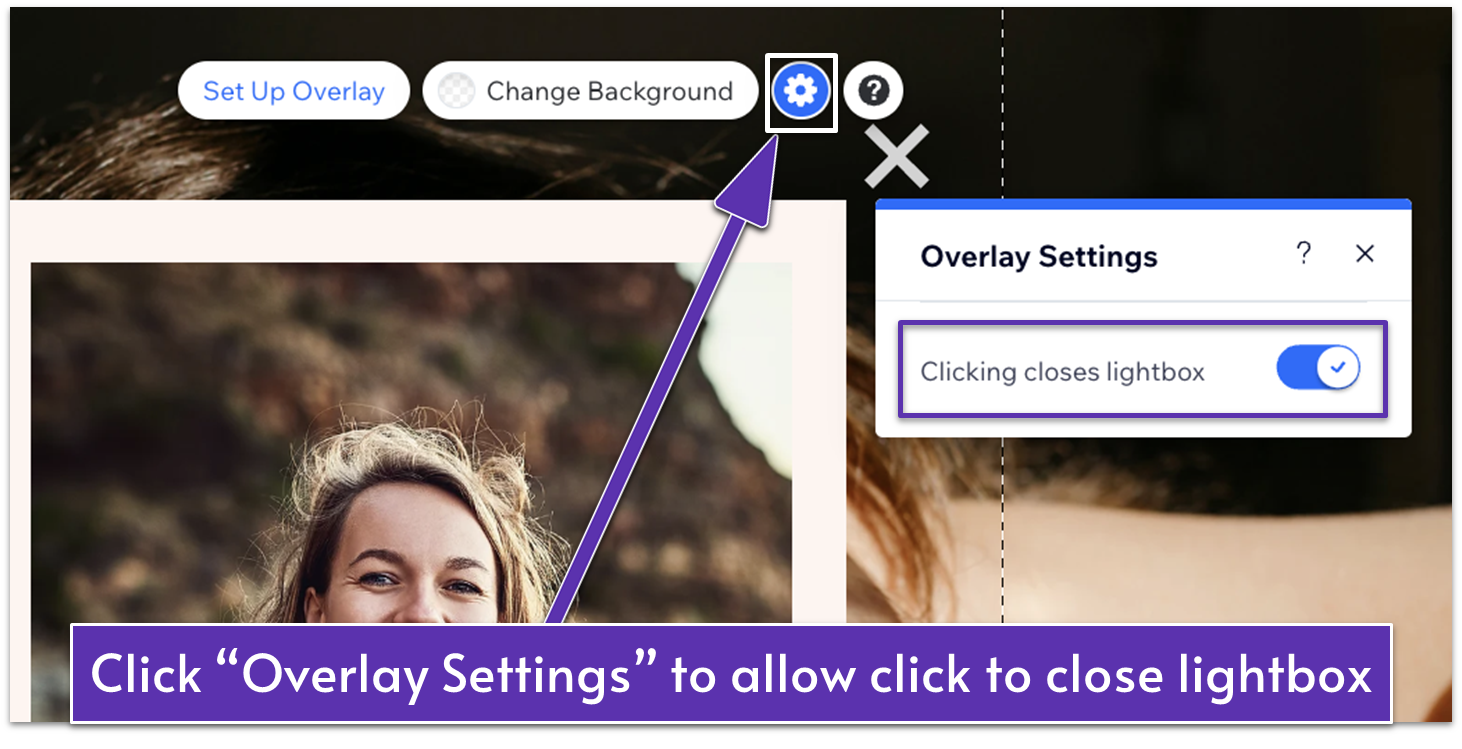
- Select the overlay.
- Click Settings
or Set Up Overlay. - Enable or disable the Clicking closes lightbox toggle. If you disable this, make sure to add an X icon or a Close button in the Lightbox Settings so visitors can exit the pop-up.
Step 8. Set When and Where Your Wix Pop-Up Appears
Decide when, where, and how your pop-up appears on your website. You can control its behavior by adjusting the settings for triggers, delay, page selection, scheduling, and closing options.
Selecting Where Your Pop-Up Appears
-
- Click the lightbox to select it.
![Wix Lightbox Settings menu, pointing to "Set Triggers" button and "yes" option selected for "Automatically display lightbox on pages"]()
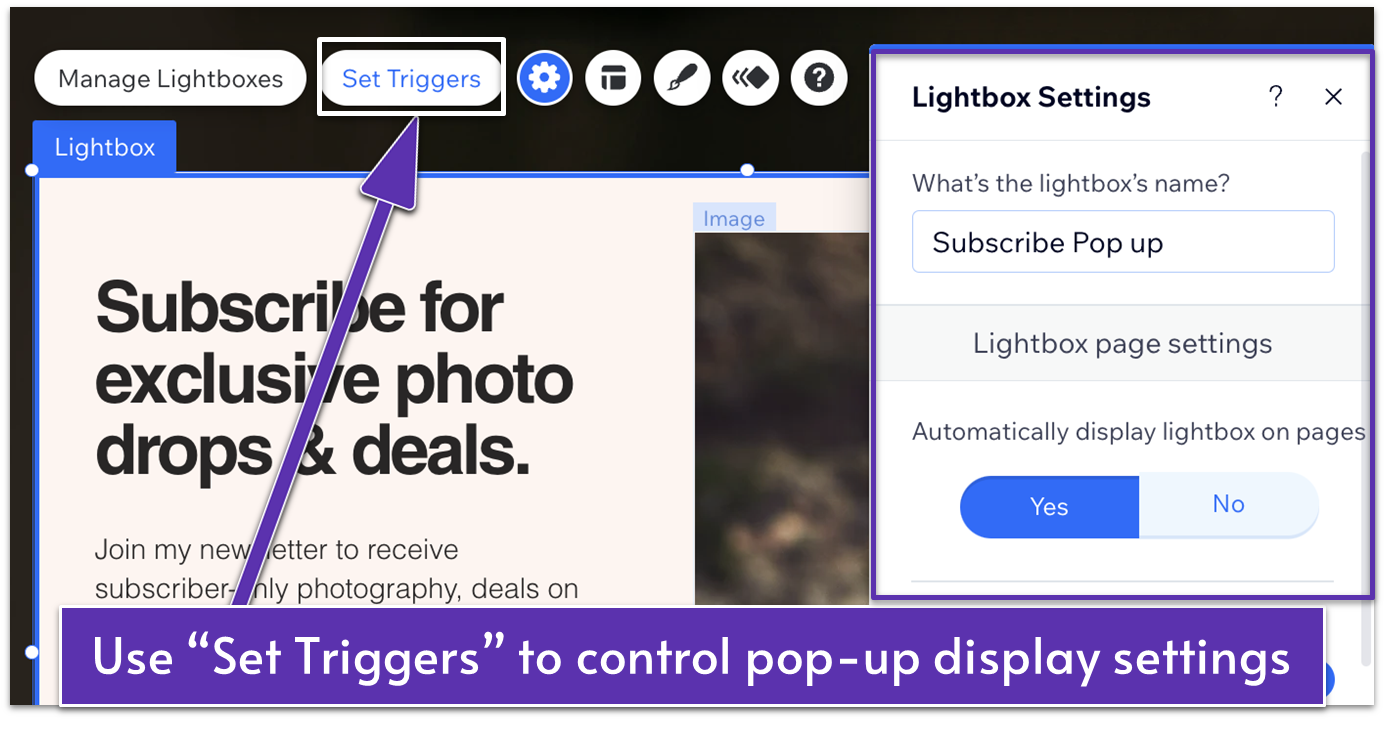
- Click Settings
or Set Triggers. - In the What’s the lightbox’s name? field, rename your lightbox to something memorable – this helps if you create multiple pop-ups.
- In Automatically display lightbox on pages, you have two options:
- Select Yes for your pop-up to appear automatically.
- Select No if you prefer to trigger the pop-up with a button click.
- Click the lightbox to select it.
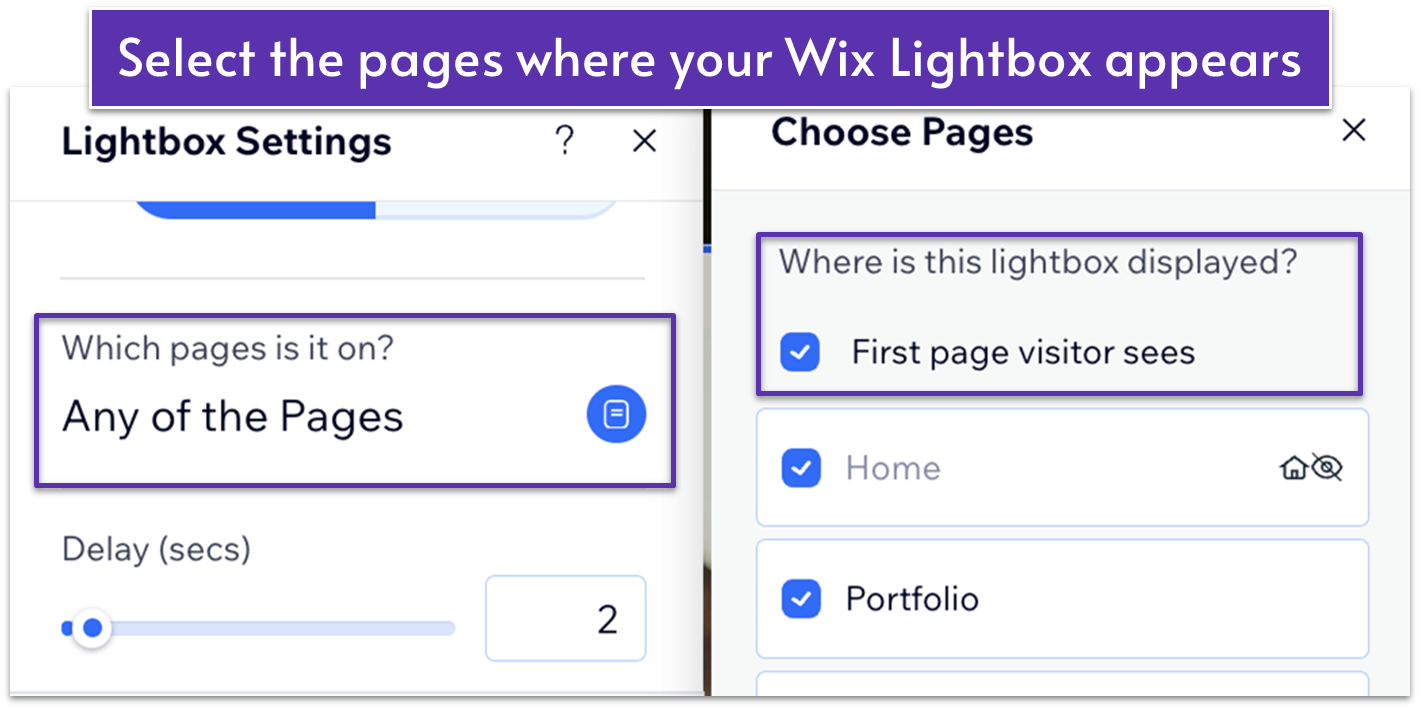
-
- Click
or the page name under Which pages is it on? - Check the pages where the pop-up should appear and uncheck the ones where it should
- Click
Tip: A page can only have one pop-up at a time, but a pop-up can appear on multiple pages. I recommend enabling First page visitor sees to avoid bothering repeat visitors. Otherwise, the pop-up will appear every time someone navigates to a checked page, which can be overwhelming.
Setting When Your Pop-Up Appears
After choosing the pages where your pop-up should show up, you can do these extra steps in the Lightbox Settings panel (via 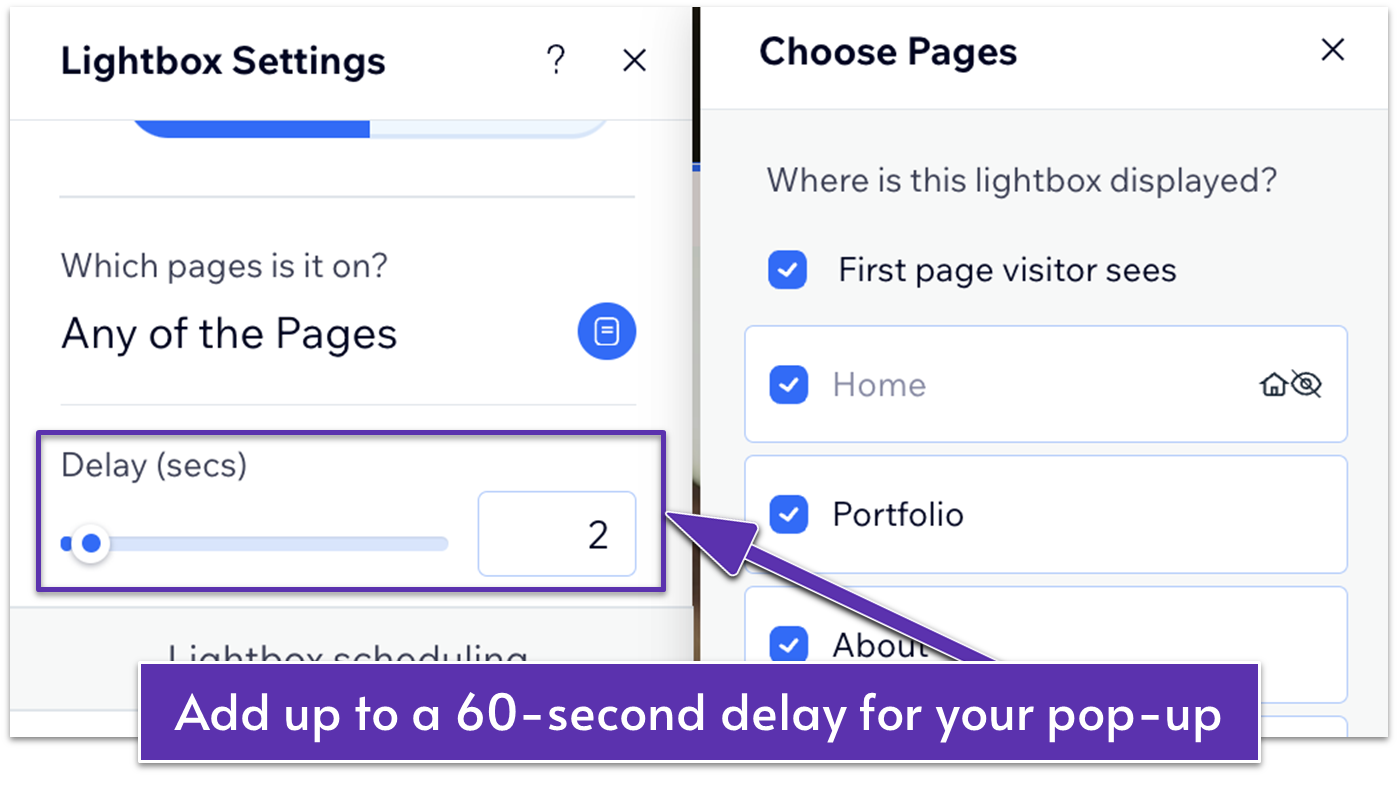
- Under Delay (secs), adjust the slider or enter a value between 0 and 60 to set the pop-up delay.
- Click Set schedule and choose the times and dates for your pop-up under Lightbox scheduling.
- Enable the ‘X’ icon and ‘Close’ button toggles to select how your lightbox closes.
Step 9. Optimize Your Wix Pop-Up for Mobile Users
Once your pop-up looks great on desktop, it’s time to check how it appears on mobile. I always recommend completing your design on desktop before making changes on mobile since changes on desktop can affect the mobile layout.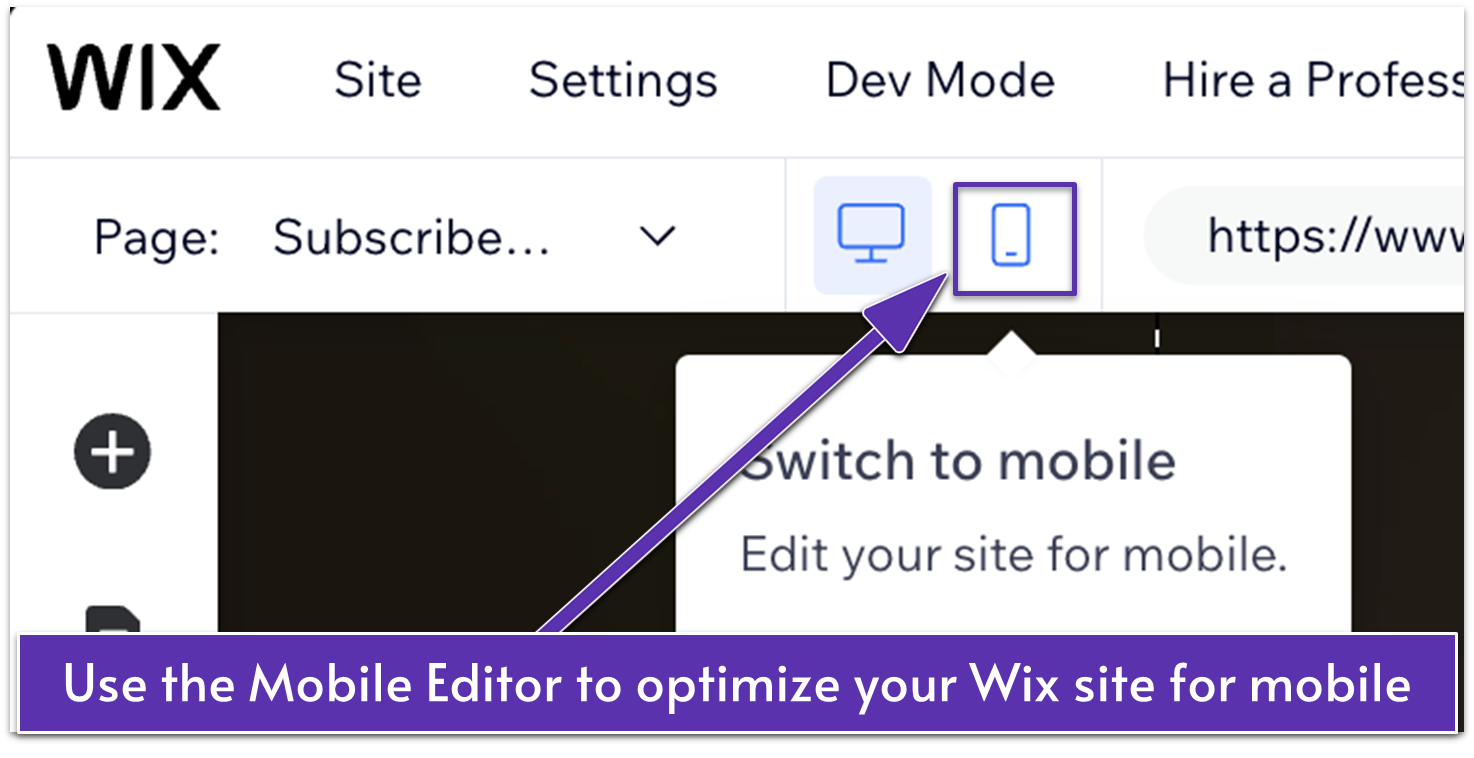
- Click the mobile phone
icon in the top bar to switch to Mobile View. - Select the pop-up to edit it.
- Drag and reposition elements for better readability.
- Adjust element size, spacing, and placement to fit smaller screens.
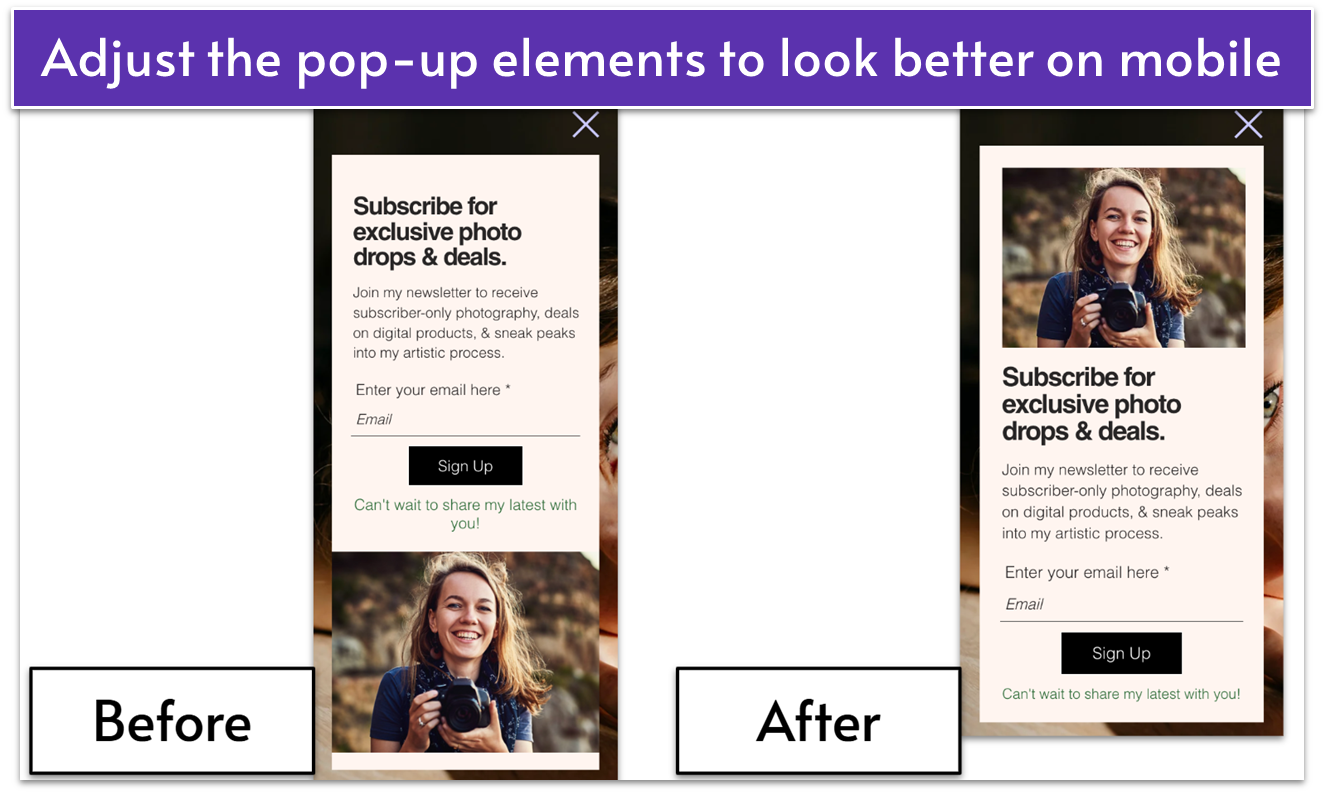 For my pop-up, I noticed that the image was at the bottom, which didn’t look right on mobile. I moved the image to the top and centered the text below it to draw visitors in before they read the headline. Small adjustments like this make sure your pop-up is easy to read and engage with on any device.
Step 10. Preview and Publish Your Wix Pop-Up
Before publishing your pop-up, take one last look to make sure everything functions as expected. Previewing lets you see how visitors will interact with it.
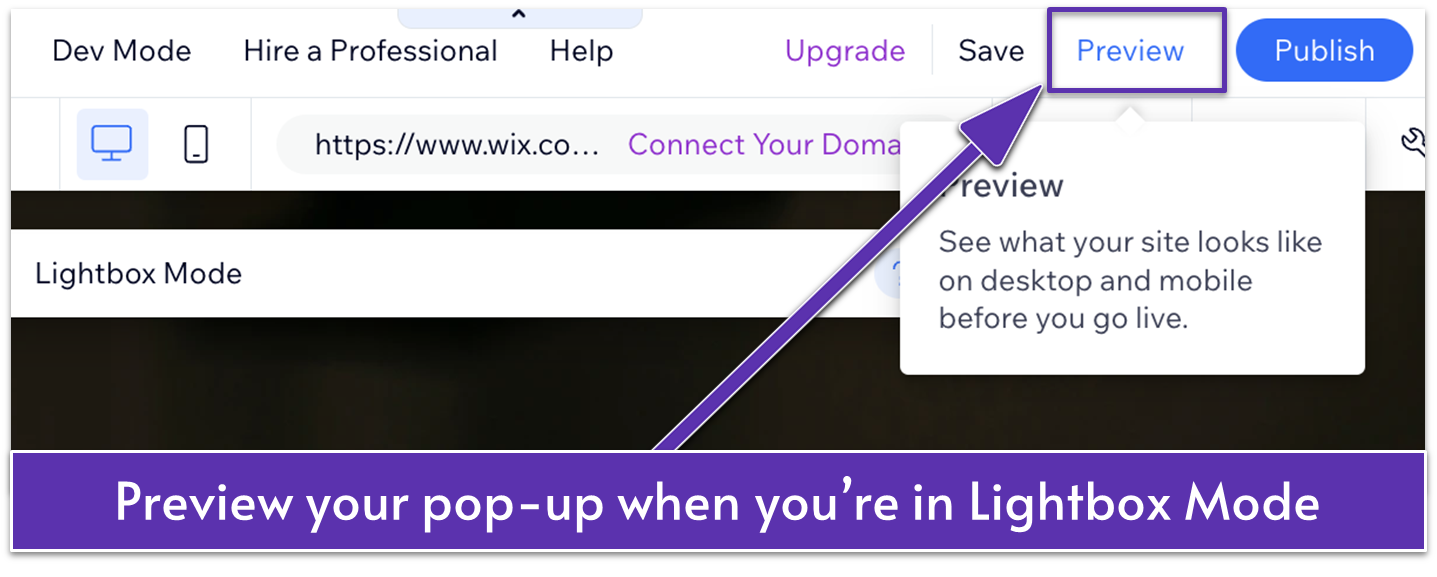
- Make sure you’re in Lightbox Mode.
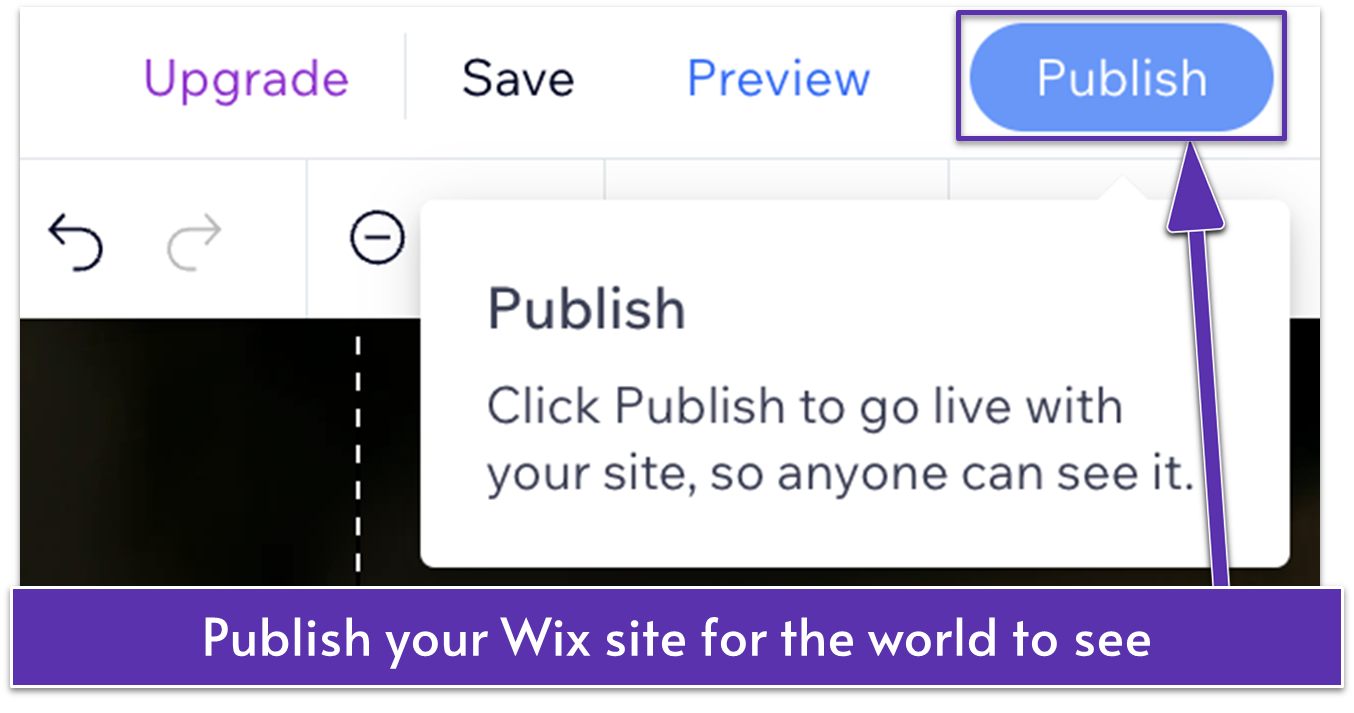
- Click Preview in the top right corner of the Wix Editor.
- Test your pop-up by interacting with it as a visitor would.
![Upper right corner in the Wix Editor, arrow pointing to "Publish" button]()
- If everything looks good, click Publish (next to Preview in the top bar).
How To Edit a Wix Pop-Up
To edit your pop-up on Wix from inside the Wix Editor, you’ll need to be in Lightbox Mode.
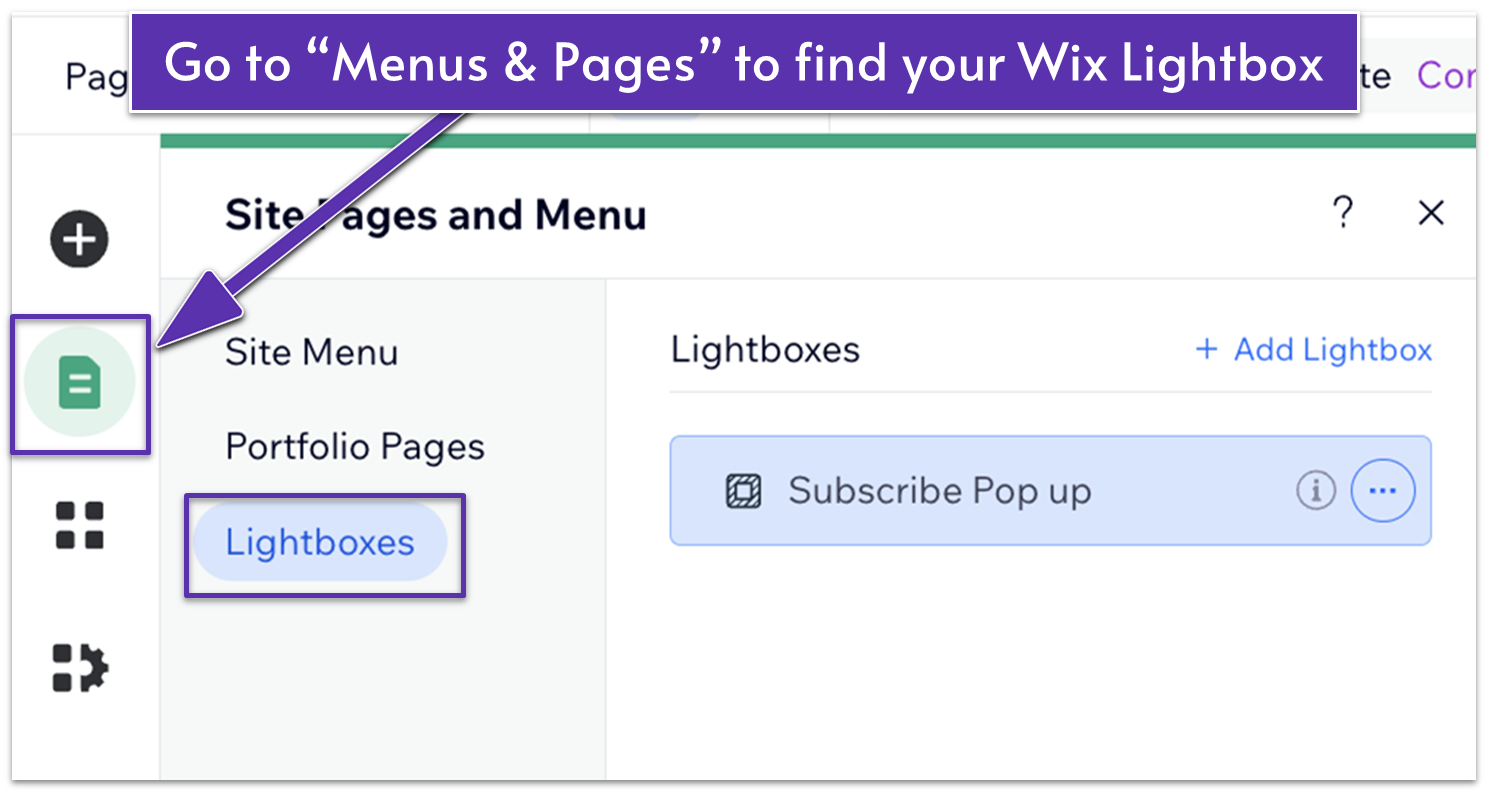
- Click Pages & Menu
in the left sidebar of the editor. - Select Lightboxes from the list of site pages.
- Select the lightbox you want to edit.
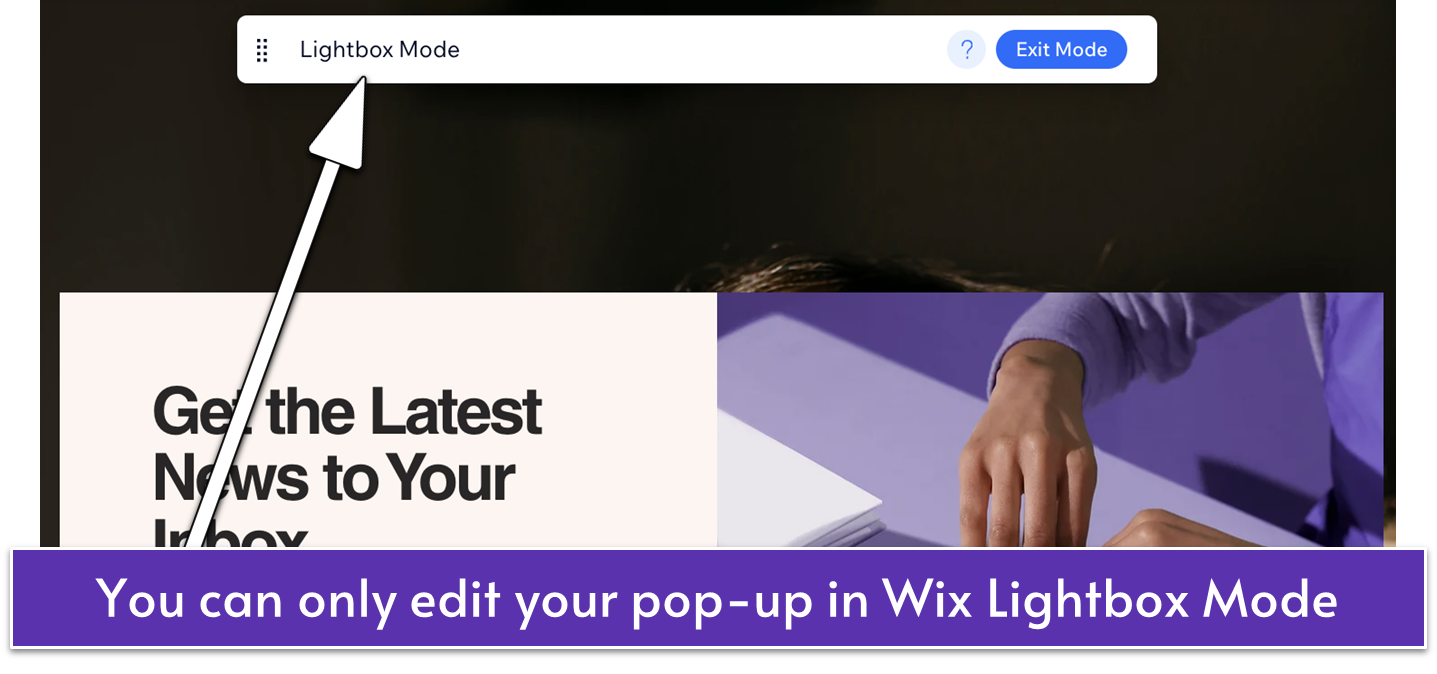 Good work! Now, you’re back in Lightbox Mode where you can make changes to the design or behavior of your pop-up.
How To Remove a Wix Pop-Up
It’s easy to remove a pop-up from your Wix website.- Click Pages & Menu
in the left sidebar of the editor. - Select Lightboxes from the list of site pages.
![Wix Editor in Site Pages and Menu, showing steps to delete a Lightbox]()
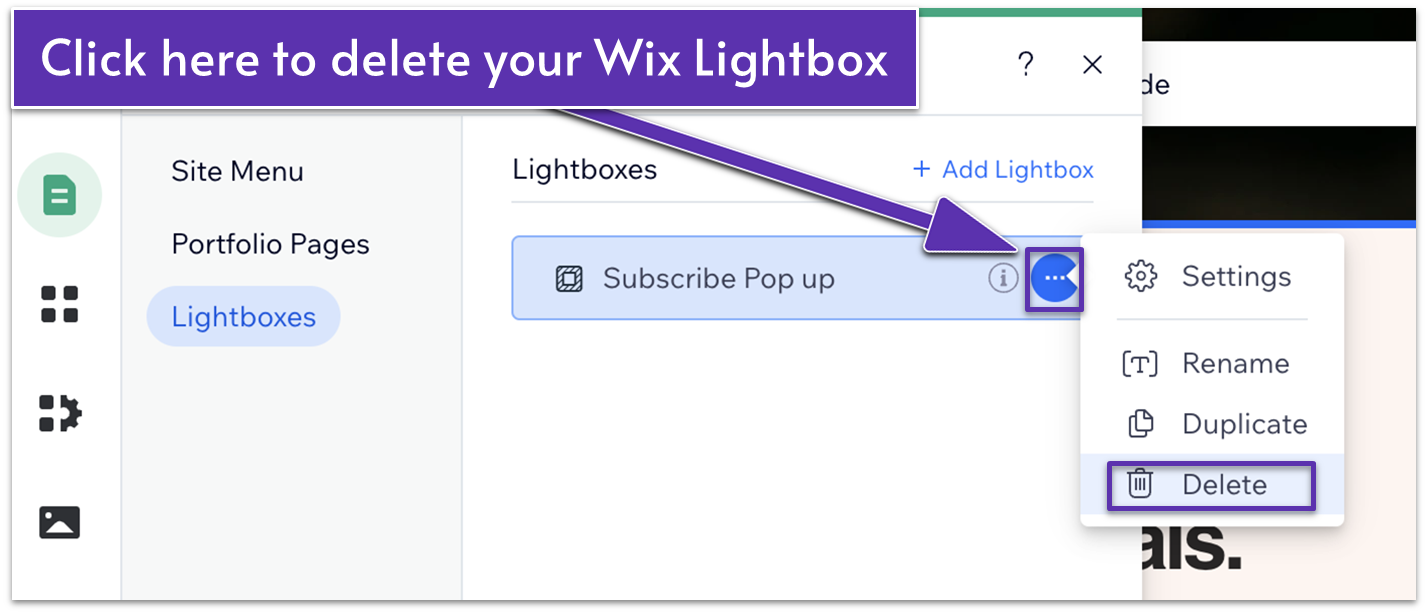
- Select the More Actions
button to show the Lightbox settings panel. - Click Delete to remove the Lightbox from your Wix site.
![Confirmation page to delete a Wix Lightbox]()
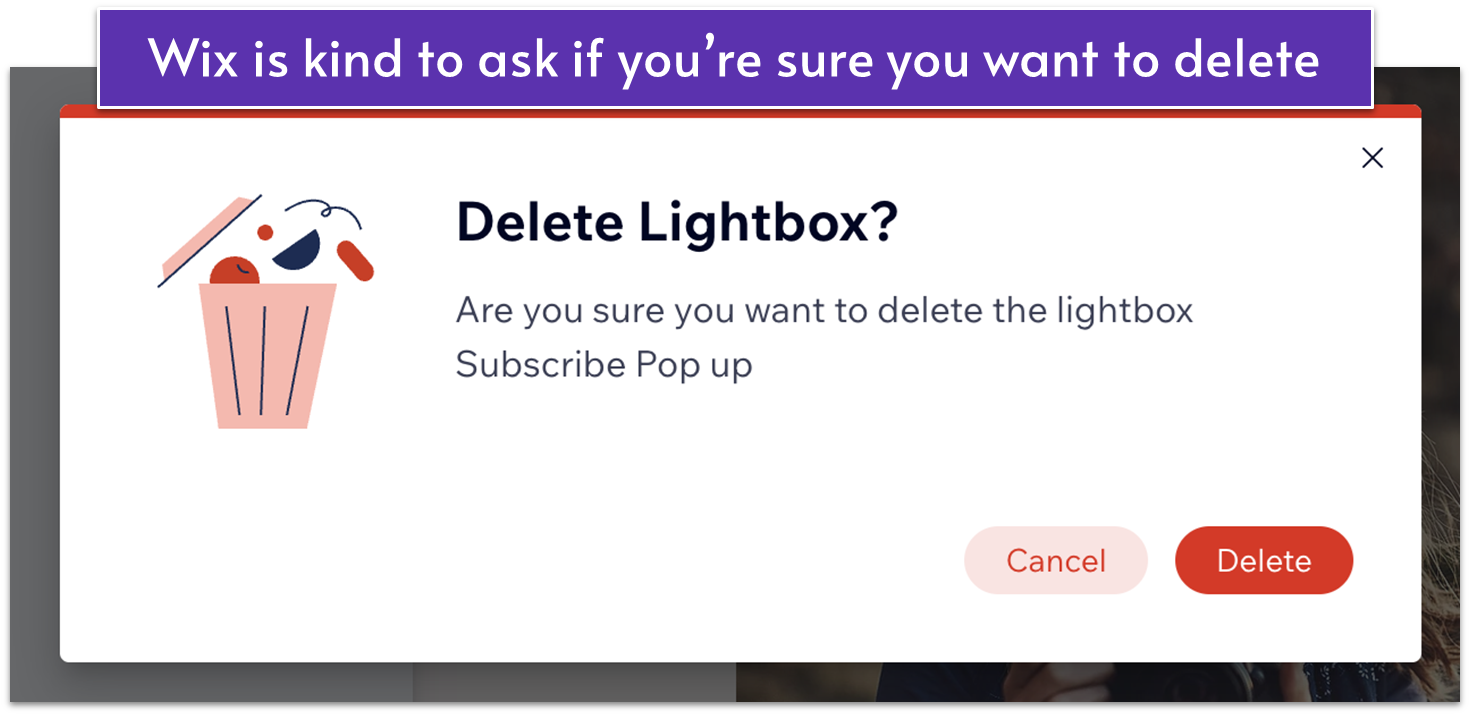
- Select Delete when Wix prompts “Are you sure?” to confirm removal.
Your Wix Pop-up Is Live and Ready To Go
 Adding a pop-up to your Wix website is simple and free when you use Wix’s built-in pop-up tool, Lightboxes. No extra apps or coding needed.
Whether you’re sharing an update, promoting a sale, or growing your email list, a well-designed pop-up can help you achieve your website goals. Start with a template that suits your needs, customize it to match your style, and you’re good to go.
Happy building, and I can’t wait to see how your pop-ups turn out!

